
- Azure AD Connector Requirement.
-
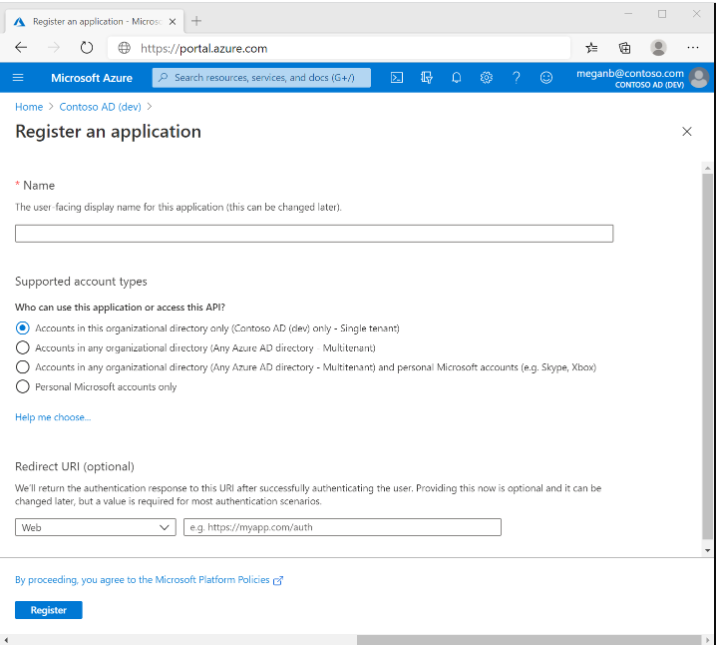
Sign in to the Microsoft Entra admin center.
-
Browse to Identity > Applications > App registrations and select New registration.
-
Enter a display Name for your application. Users of your application might see the display name when they use the app, for example during sign-in. You can change the display name at any time and multiple app registrations can share the same name. The app registration’s automatically generated Application (client) ID, not its display name, uniquely identifies your app within the identity platform.
-
Select the Supported account types as Accounts in this organizational directory only (<Tenant Name/domain> only – Single tenant).
-
Don’t enter anything for Redirect URI (optional).
-
Select Register to complete the initial app registration.
-
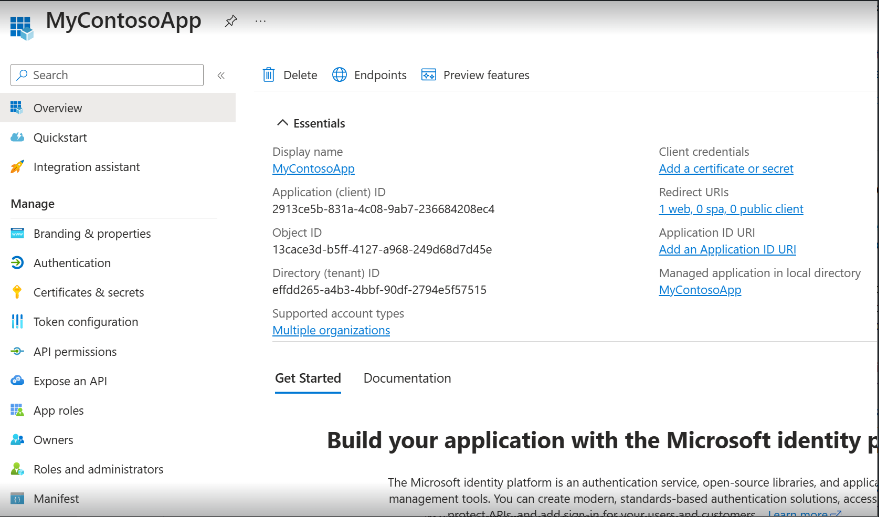
Once the registration finishes, the Microsoft Entra admin center displays the app registration’s Overview pane. You see the Application (client) ID. Also called the client ID.
-
Also, you see the Client credentials, Select the Add certificate or secret > New client secret (or If using already registered, then select your application. Then Select Certificates & secrets > Client secrets > New client secret).
-
Add a description for your client secret.
-
Select an expiration for the secret or specify a custom lifetime. Client secret lifetime is limited to two years (24 months) or less. You can’t specify a custom lifetime longer than 24 months.
-
Select Add.
-
Record the secret’s value for use in your client application code. This secret value is never displayed again after you leave this page.
-
Add permission to access Mail and User API,
- Select API permissions > Add a permission > Microsoft APIs. Select Microsoft Graph and then, Application permissions.
- Under Select permissions, Search for User, and Select User.Read, User.Read.All, User.ReadWrite.All.
-
Select API permissions > Add a permission > Microsoft APIs. Select Microsoft Graph and then, Application permissions.
-
Under Select Permissions, Search for Audit, and Select AuditLog.Read.All

-
Rolling Window Login Anomaly – Number of Days to be consider for User Login Attempts to Identify the mean of User Login Time. (For Example: Rolling Window Login Anomaly as 5).
-
Threshold Login Anomaly – Threshold in hours to detect the Login Anomalies based on the mean of Successful Login time. (For Example: If threshold as 2 hours. Then, if user mean login time is 9 AM and current login time is 11 AM. Then this will be not an anomaly. And If current login time of the user is 12 PM, then this will be detected as anomaly.)
-
Rolling Window Location Anomaly – To Check the number of location for detecting anomalies. (For Example: Rolling Window Location Anomaly as 3. This means Last 3 locations.)
-
Time Interval and Threshold: Suppose Time Interval as 5 minutes and Threshold as 3, then if an user in 5 minutes attempts an 3 failure login attempts, then 1 alert will be generate.
- Configuration of Azure AD Connector.
-
Under the connector, go to Ingestion.
-
Select the Azure AD Connector, then click on configure the connector.
-
Enter the Client Domain (Ex. quickheal.com), Client Id, Client Secret, Time Interval (in mins), Threshold Login Anomaly (in hrs), Rolling Window Login Anomaly (in days), Rolling Window Location Anomaly (Number of Location), and Failure Attempt Threshold (in numbers).
-
Select the Validate and Save.