

Data Summary Report provides a comprehensive overview of the PCI data, including its Data Source Instance, Data Source, Data Classifier, Business and Technology Owner and count of records. It offers insights and analysis to help understand the scope and impact of PCI data within the enterprise.
Note: The dashboard data gets reflected every midnight by scheduled job.
Accessing the Data Summary Report
- Log on to Seqrite Data Privacy )SDP) console.
- From the navigation menu, go to Analytics>>Data Summary Reports.
Searching for Data Summary Records
To search for data summary records, the following options are available in the Select box, to form a search query.
Filter
With this option, you can create and save search queries based on the selected filters. To create a search query, follow these steps:
- Select appropriate filters from the following supported filters.
- Datasource Instance
- Data Source
- Classifier
- Business Owner
- Technology Owner
- Tags (Two-level filter)
- Data Compliance
- Data Sensitivity
- Data Type
- Impacted Areas
- Click the edit box and build the query filters. Select the filters and filter values from the list. You can use query operators like AND/OR also add brackets between multiple filters while creating the query.
Note
The ‘Remove Brackets’ option is available to remove the brackets in the search query if any. - Click Add. The Selected Filters section shows the newly created search query. Here you can also edit or delete the created search query.
- Click Apply. The page shows the search results based on the created and applied search query.
You can save the created search query for future use, which will be available in the Reports option.
Note
The Tags are two-level filters, meaning key-value pairs. For Example, Tags.DataCompliance, Tags.Datasource etc.
Reports
This option shows two sections as follows.
- Recently Searched: This section shows the recent two saved queries.
- Saved Queries: This section shows all the saved queries.
Understanding the Data Summary Report
The report is organized into the following sections:
- Executive Summary Report
- Operational Insights Report
- Detailed Drill Down report
Executive Summary Report
The page displays the summary of PII found for the scanned database instances as follows.
Shows the list view of all the data summary reports.
| Column Name | Description |
|---|---|
| Datasource Instance | The Datasource Instance name. |
| Data Source | The configured Data Source name (File Server and DataBase). |
| Classifier | Classifier name. |
| Business Owner | Shows the business owner of the instance. |
| Technology Owner | Shows the technology owner of the instance. |
| Record Count | Number of scanned records. |
| Scan Date | Date of the most recent scan conducted. |
| Tags | Associated tags. |
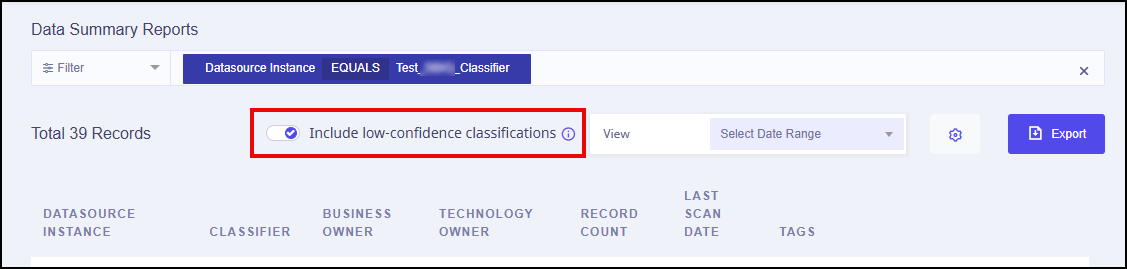
Switching the Include low-confidence classifications toggle off shows only high-confidence records, while switching it on shows all records, including low-confidence ones.
Exporting Executive Summary Report
The Data Summary Reports Page displays the summary of PII found for the scanned database instances as follows.
| Column Name | Description |
|---|---|
| Datasource Instance | The Datasource Instance name. |
| Data Source | The configured Data Source name (File Server and DataBase). |
| Classifier | Classifier name. |
| Business Owner | Shows the business owner of the instance. |
| Technology Owner | Shows the technology owner of the instance. |
| Record Count | Number of scanned records. |
| Scan Date | Date of the most recent scan conducted. |
| Tags | Associated tags. |
Switching the Include low-confidence classifications toggle off shows only high-confidence records, while switching it on shows all records, including low-confidence ones.
To export the Data Summary Report, click the Export as CSV located in the upper right corner.
You can control the number of columns you want to show on the summary page or in the exported excel file, from the setting icon beside the Export button.
Searching for Data Summary Records
To search for data summary records, the following options are available in the Select box, to form a search query.
- Filter
- Reports
Filter
With this option, you can create and save search queries based on the selected filters.
To create a search query follow these steps.
- Select appropriate filters from the following supported filters.
- Datasource Instance
- Data Source
- Classifier
- Business Owner
- Technology Owner
- Tags (Two-level filter)
- Data Compliance
- Data Sensitivity
- Data Type
- Impacted Areas
- Click the edit box and build the query filters. Select the filters and filter values from the list. You can use query operators like AND/OR also add brackets between multiple filters while creating the query.
Note
The ‘Remove Brackets’ option is available to remove the brackets in the search query if any. - Click Add. The Selected Filters section shows the newly created search query. Here you can also edit or delete the created search query.
- Click Apply. The page shows the search results based on the created and applied search query.
You can save the created search query for future use, which will be available in the Reports option.
Note
The Tags are two-level filters, meaning key-value pairs. For Example, Tags.DataCompliance, Tags.Datasource etc.
Reports
This option shows two sections as follows.
- Recently Searched
This section shows the recent two saved queries. - Saved Queries
This section shows all the saved queries.
Drill Down Report
You can access the path within the Drill-Down Report, offering enhanced visibility into the precise location of PII data, confidence level and other matched classifiers.
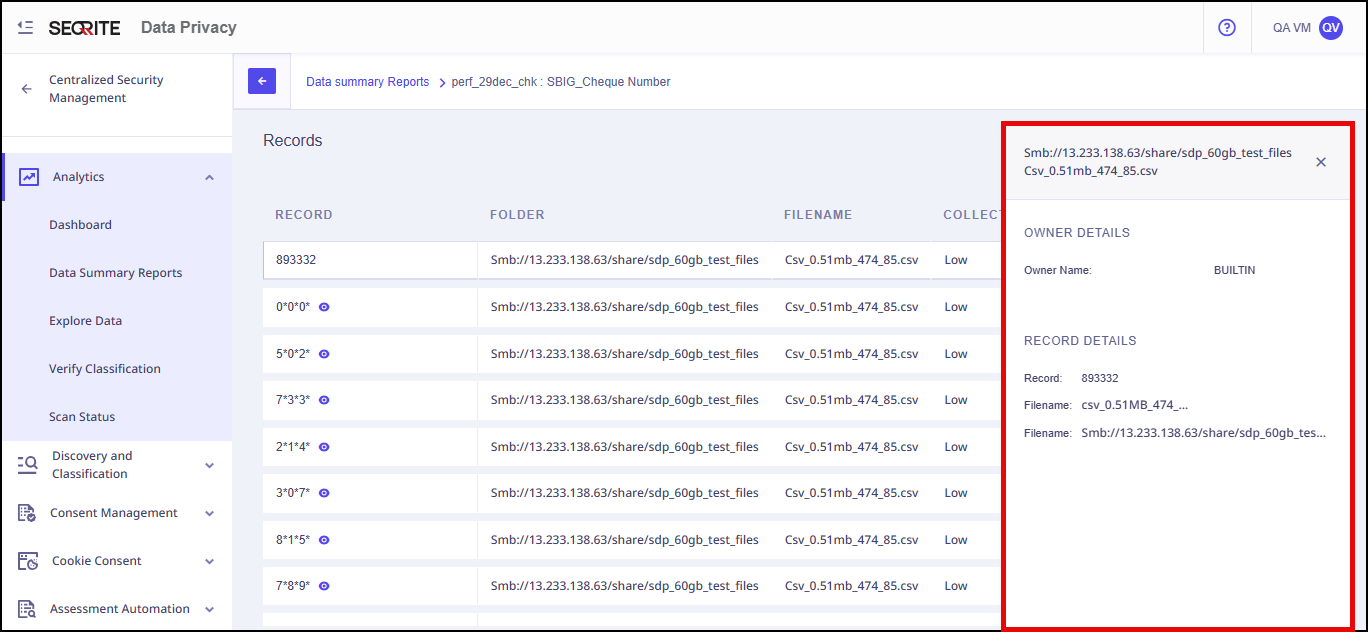
To view the detailed drilled down report:
- Select the data source instance for which you want to view the matching PII records.
The Intermediate Report is displayed, showing the PII locations and match counts for the selected connector. - Select the required folder, table, or email, depending on the connector type.
Note: The Intermediate Report displays folders, emails, or tables based on the selected connector type.
The system displays a detailed drill-down report with the corresponding matching PII records.
Note: ☛
PII information location is accessible across all data sources, while user context details (Owner Details) are exclusively available for file-based data sources.
Switching the Include low-confidence classifications toggle off shows only high-confidence records, while switching it on shows all records.
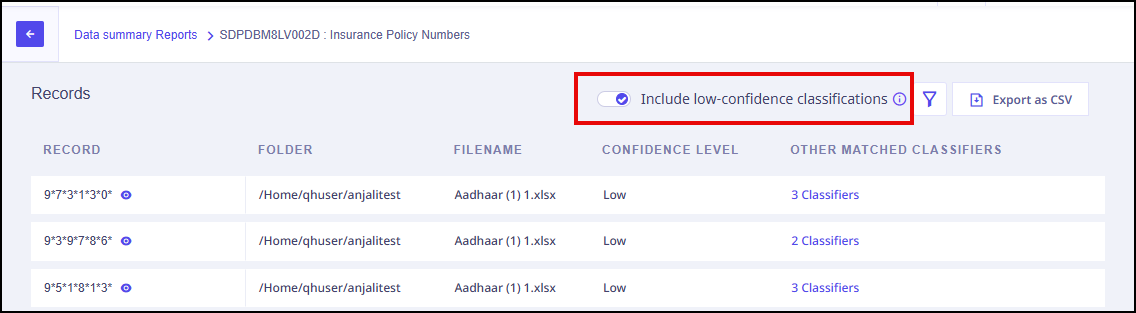
You can view the other matched classifier details by just clicking on them. You can also filter classifiers by their name and view the required classifiers along with their confidence level.
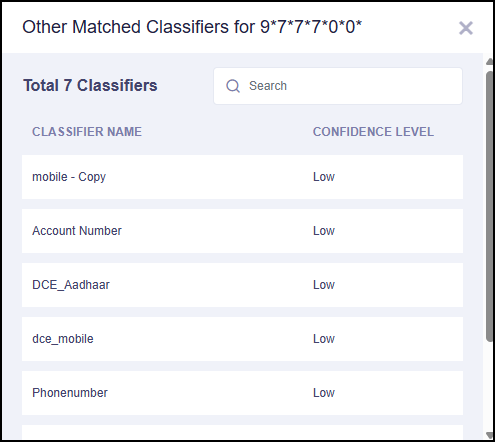
Note: The system shows the classifier filter only when more than five matched classifiers exist.
–>