
OVA (Open Virtualization Appliance) file contains a compressed version of a virtual machine. When you deploy an OVA file, the virtual machine is extracted and imported into the virtualization software installed on your computer.
The OVA build file is provided to address any of the following scenarios at the customer end.
- Ubuntu 24.04.3 LTS machine is not available.
- Only Windows machines are available.
This OVA will create an Ubuntu 24.04.3 LTS machine on top of the VirtualBox and then you can proceed through the configuration of the pre-installed EPP server.
Prerequisites
Hardware Requirements
Physical Windows Machine with
- RAM 16GB or more
- Disk space: 150GB or above
- CPU: 8 Core (x86-64) or above, 2.6GHZ or above
Software Requirements
- The VT-x must be enabled in the physical machine’s BIOS
- The AVX must be enabled in the physical machine’s BIOS
- Oracle Virtual Box 7.2.6
Network Requirements
- Keep the following details ready and handy
- Static IP Address
- Gateway
- Subnet mask
- DNS (DNS not required if you are creating an offline/without internet setup)
Note: If you are planning to use the proxy server, keep the proxy server details handy
Supported Web Browsers
- Google Chrome v67 and above
- Mozilla Firefox v65 and above
- Microsoft Edge
For supported File extensions, Ports, and URLs refer this topic.
Note: For seamless working of OVA over virtual box, it is recommended to have only one hypervisor installed on the system. Other than the Oracle Virtual Box, ensure that no other hypervisor is installed on the system. The system requirements and prerequisites shared here are for the number of endpoints ranging between 1 to 2000.
For more than 2000 endpoints please refer here.
Deploy OVA on VirtualBox
Get the EPP 8.4 OVA build from the link below. Keep the product key handy as you will be shown the download link only after entering the product key: https://www.seqrite.com/seqrite-product-installer/
- Download and install Oracle VirtualBox on Windows machine
- Open the VirtualBox
- Go to File > Import Appliance
- Click Browse and select EPP_8.4_UBUNTU24.ova file you just downloaded.
- Click Next and follow the wizard.
- Click Import.
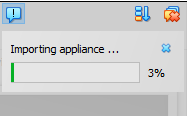
When the Import is complete, VirtualBox creates the VM with Ubuntu 24.04.3 with the required EPP 8.4 packages. On this VM, you will be guided to configuring and installing the EPP 8.4 server.
- Once the import is completed, Start the VM and it will show the Network Error prompt shown below. (Here, you need to click ‘Change Network Settings.’)
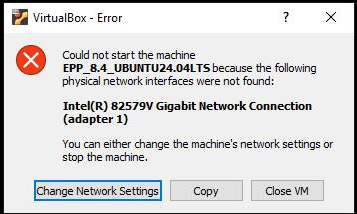
The error prompt disappears.
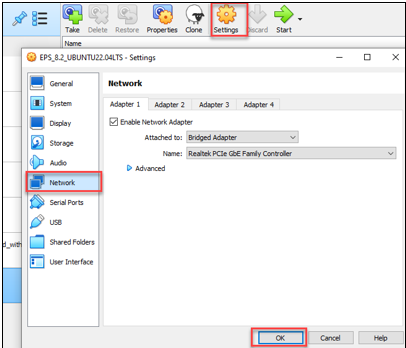
- Go to Settings > Network. Click Ok.
- Oracle VM VirtualBox Manager window appears.
- Now click Start icon to start the VM.
Configure Server
- On the VM, login with the given credentials.
To get the credentials, please contact support team.
Note: It is recommended to change the password after installing the EPP server. You will be shown a prompt to do the same right after EPP 8.4 is successfully installed.
- Provide the following details one after another and hit [Enter].
- Static IP Address
- Subnet mask
- Gateway
- DNS
- As you can see in the above image, DNS IP is needed only if you want to create a setup with internet (connected to internet/online setup).
- If you wish to create offline setup (a setup without internet) then skip the last input field just by hitting [Enter] key, leave it blank.
Steps to install Seqrite EPP 8.4
Once the IP configuration is successful it will take you to the product installation wizard.
- The Installer Wizard screen appears. Select 1 for installation and hit [Enter]
- On the License agreement screen hit [Enter] to proceed or hit R to read the details.
- Hit A to accept the License Agreement or D to decline. If you hit D, the installer will exit. Hitting A will continue the installation.
- Next, the Privacy Policy screen will appear. Hit [Enter] to proceed, or R to read the details.
- Hit A to accept the Privacy Policy or D to decline. If you hit D, the installer will exit. Hitting A will continue the installation.
- Next, the Customer Information screen will appear. Enter the First Name, Last Name, Company Name, Administrator Email Address, Mobile Number, Phone number, Address, Country, State, City.
- Here, the Server Information screen will appear. Hit [Enter] to continue with the recommended HTTP and SSL port or enter the desired port and hit [Enter]
- Now, the Proxy Settings screen will appear. Select 1 if you wish to Enable Proxy Settings. Or select 2 if you do not wish to enable proxy settings.
- If 1 is selected, then enter the Proxy Server IP, port and the desired authentication method.
- Next, Authentication screen will appear. Hit [Enter] if you wish to continue with the email address provided in Customer Information screen, or enter desired Administrator email address (this is the username of Administrator user who logs in to the EPP 8.4 console. Please make sure you are entering the correct email address without any typographical errors). Enter and confirm the password for Administrator user.
- Select 1 to specify the Client credentials, 2 to proceed without it.
- After the client credentials are provided (or skipped), select 1 to save the summary file (recommended) or 2 to continue without saving.
- The installation of EPP 8.4 server will begin. It will take 15-20 mins (time can vary based on the system configuration) to complete the installation.
- Once the EPP 8.4 server is installed, it will ask you to change the password of the EPP user you used to configure the server. You need to relogin with the changed password.
- After re-logging in, it will show you below options (each time the EPP user logs in).
- Hit 1+ [Enter] to – Restart stopped or inactive EPP 8.4 services.
- Hit 2 + [Enter] to – Collect the EPP 8.4 logs. These logs will be requested by Seqrite Support team whenever you reach out to them with an issue that requires Support team’s guidance.
- Hit 3 + [Enter] to – Reboot the VM.
- Hit X + [Enter] to – exit the VM session, it will take you to the VM login screen.
Now you can proceed to activate EPP 8.4, either online or offline, depending on the setup you created.
Steps to Offline Activation
Pre- requisites:
When the EPP 8.4 server has no internet connectivity and needs to be activated, such offline activation can be completed with the help of an online machine equipped with Support Activation utility. In this case, we have two servers/machines that we work with:
- The EPP 8.4 server machine (offline)
- The Support Activation machine (Which should be an Ubuntu Linux Machine, must have Internet Connection
The second machine, has Support Activation utility, will have the following: offlinesupportactivation.sh & qh-eps-offline-activation-tool.jar* files under the /opt/offline/ directory.
Here is the link to download the Support Activation utility: https://dlupdate.quickheal.com/builds/seqrite/84/en/offlinesupportactivation_8.4.zip
Follow the below mentioned steps for the offline activation:
- After the successful installation, go to /opt/Seqrite_EndPoint_Security/tools/offline_activation/ directory on the EPP 8.4 offline server.
- Copy the offline activation.txt from the offline EPP 8.4 server to the following location: /opt/offline/ directory on the Support Activation server/machine that has internet connection.
- After copying the offlineactivation.txt to the Support Activation machine, under the /opt/offline/ directory, run the offlinesupportactivation.sh using the below command:bash offlinesupportactivation.sh
- It’ll ask to enter the product key now, enter the product key and press Enter.
- Below options will be displayed:
- For Normal installation of EPP server activation or License sync select the first option
- For Control Centre / AGR activation or License sync select second option
- For Control Site Server / SSR activation or License sync select Third option
- Perform the activation or License sync by selecting the appropriate option as mentioned.
- A message saying ‘Seqrite Endpoint Protection has been activated successfully’ will be displayed.
- This will produce one file named as following: ofresponse.txt in the same directory i.e. /opt/offline/
- Copy the ofresponse.txt file from the Support Activation machine to the offline EPP 8.4 server at this location: /opt/Seqrite_EndPoint_Security/tools/offline_activation/ directory.
- After, the ofresponse.txt file is copied successfully to the offline EPP8.4 server, run offlineclientactivation.sh at below mentioned location: /opt/Seqrite_EndPoint_Security/tools/offline activation/ (from EPP 8.4 server) location
- Now, run with the below mentioned command on the offline EPP8.4 server: bash offlineclientactivation.sh. A message ‘Activation successful’ will be displayed.
After successfully installing the EPP 8.4 server, as mentioned in the Note of ‘Configure Server’ section above, a prompt will ask you to change the password of the user you used to configure and install the EPP 8.4 OVA. This user is later used to restart the EPP 8.4 services or collect the logs as and when needed.
Log on to Server
- Paste the console access URL in the browser. Example: https://ipaddress/login/eps.
- Provide the credentials.
Seqrite Endpoint Protection console is ready to use.
Supported Web Browsers:
- Google Chrome v67 and above
- Mozilla Firefox v65 and above
- Microsoft Edge.
Exiting the Setup
You can exit from the setup process by pressing Control C keys. Confirmation message appears. Again, press Control C to exit the setup.