
IdP integration enables organizations to scan only specific users, groups, or data sources within their environment, instead of scanning everything broadly. This targeted approach improves efficiency, reduces unnecessary exposure of personal information, and ensures that privacy and compliance requirements are met by focusing only on the data that truly matters.
Benefits of IdP Integration
- Optimized Scanning: Organizations can exclude irrelevant users or groups, saving time and resources by only scanning what matters.
- Granular Control: Admins can adjust scans to focus on specific user roles, departments, or access levels. This gives them precise control over what gets scanned, instead of scanning the entire environment.
- Faster Proof of Concept: This makes proof‑of‑concepts at the customer end faster, easier to manage, and more targeted to the areas that matter most.
Supported IdP Types
- Active Directory 2012
- Active Directory 2016
- Active Directory 2019
- Active Directory 2022
- Microsoft Azure
Note:
- For Cloud deployment, IDP type creation is managed through the Seqrite Centralized Security Management (CSM).
- For On-Prem deployment , IDP type creation must be performed from the Seqrite Data Privacy console.
Viewing IdPs
On this page, the following information about the configured IdP is displayed.
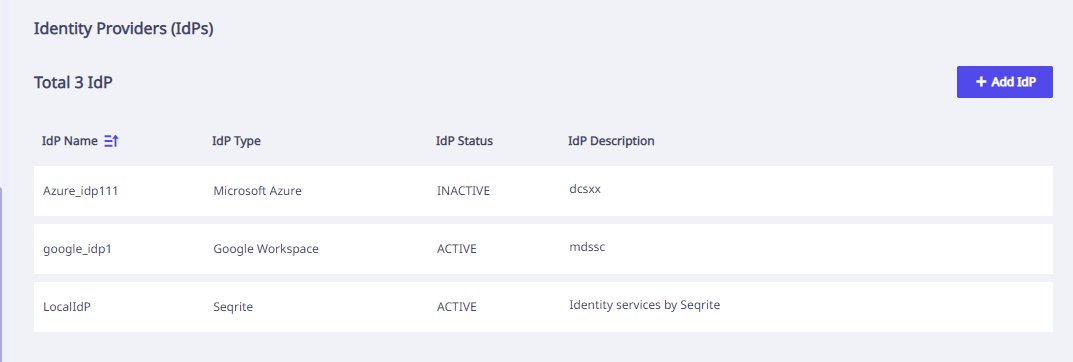
| Column Name | Description |
|---|---|
| IdP Name | Name of the IdP |
| IdP Type | IdP type |
| IdP State | State of the IdP whether Active or Inactive |
| Idp Description | Description of the IdP |
| Add IdP | To add a new IdP |
Actions available with IdP
- Edit: Edit/Update the details of the selected IdP
- Delete: Remove/Delete the selected IdP from the list.
IdP Integration
IdP integration includes two steps:
Adding an IdP
To add a new IdP, follow these steps.
- From the left navigation pane, go to Integrations > Identity Providers (IdPs).
- Click Add IdPs.
- Enter IdP Details that is IdP Name and Description.
- Select the IdP Type from the drop-down.
- Based on the IdP Type selected, enter the following details for Active Directory IdP types:
- Enter the following details for Microsoft Azure IdP type:
- Click Add.
- Click Confirm to proceed.
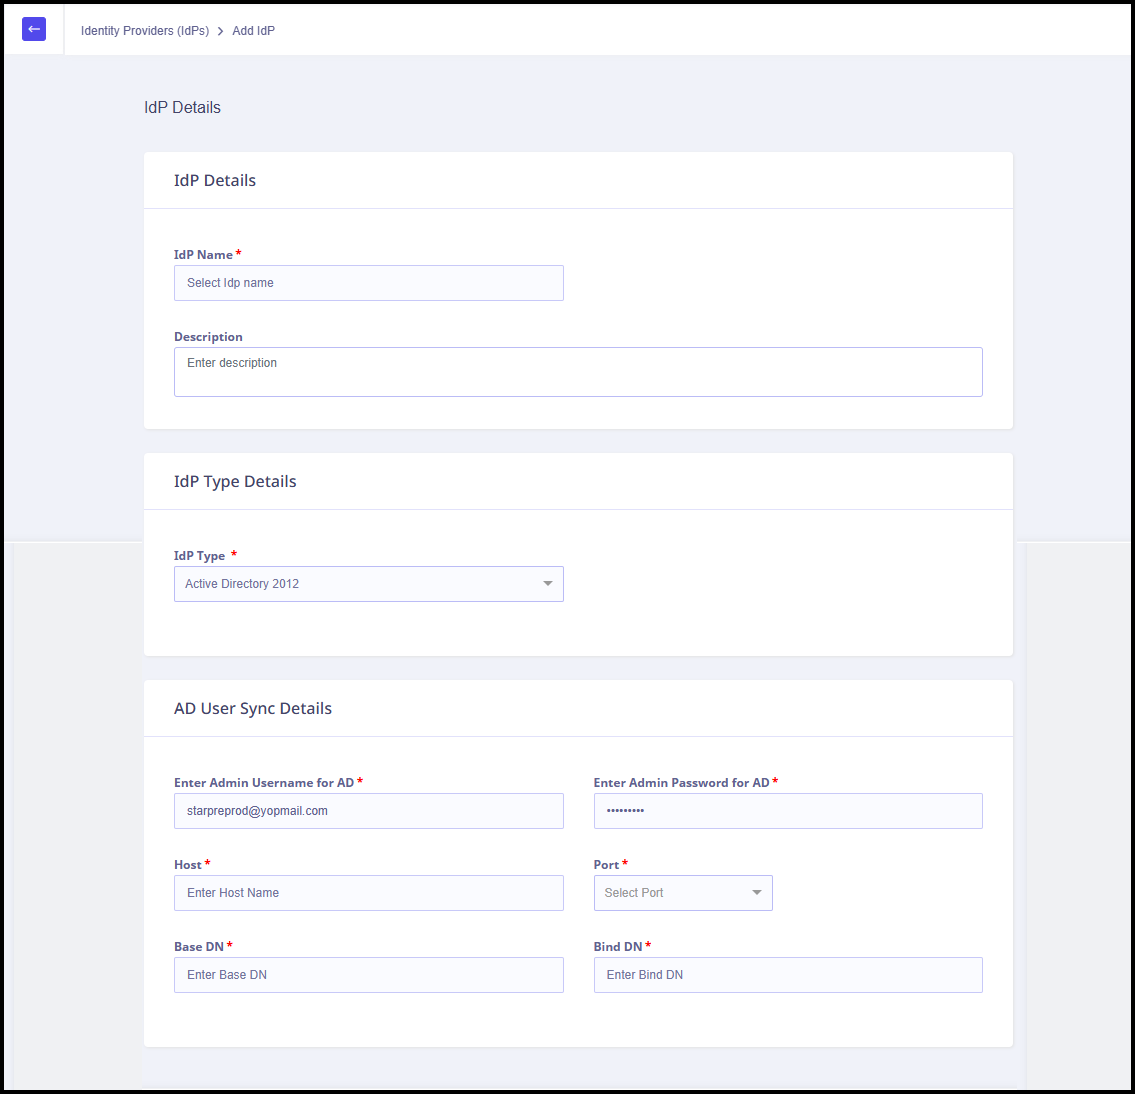
| Fields | Description |
|---|---|
| Enter Admin Username for AD | Name of the Admin User. |
| Enter Admin Password for AD | Admin Password. |
| Host | Hostname. |
| Port | Port number. |
| Base DN | Base DN for the IdP. |
| Bind DN | Bind DN for the IdP. |
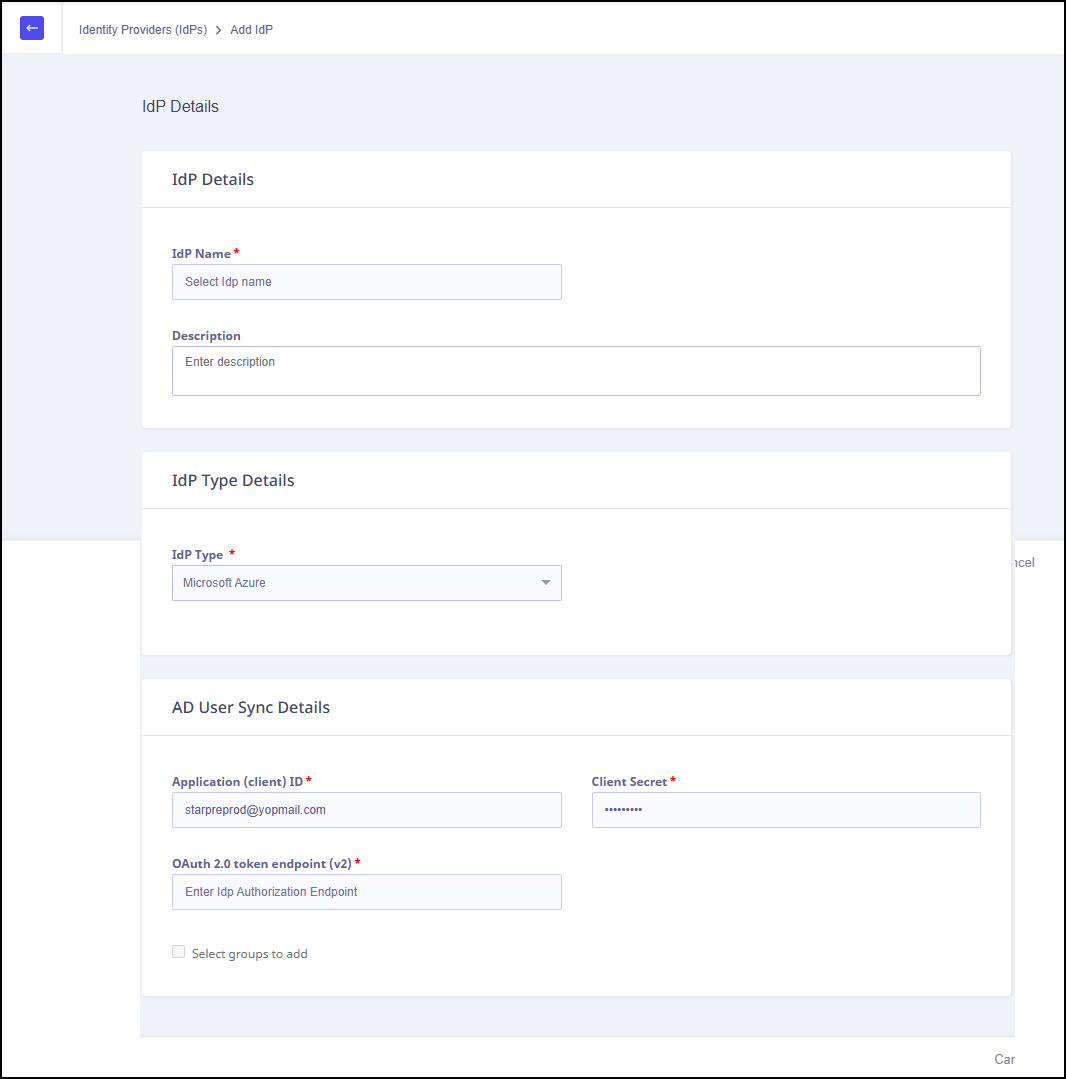
| Fields | Description |
|---|---|
| Application (client) ID | Application (client) ID |
| Client Secret | Client Secret |
| OAuth 2.0 token endpoint (v2) | Authorization Code |
Note: The Application (client) ID, Client Secret , and OAuth 2.0 token endpoint (v2) are generated during Configure the App Registration in Microsoft Entra are required here.
A confirmation message Adding new IdP will deactivate previously active IdP and remove the synced Users and Tags data. The removed data can not be recovered. appears.
A success message appears. You can verify the status of the newly added IdP by visiting Identity Providers (IdPs) page.
Note: Any addition, deletion, or modification of attributes in a Microsoft Account will take up to 4 hours to synchronize with the Data Privacy system.
Creating a Tag
To learn more. refer to, IDP Tags
Prerequisite for Microsoft Azure IdP
The prerequisite for configuring Azure IdP is creating an app registration. To learn more, refer to, Prerequisite for Microsoft Azure IdP.