The purpose of this document is to provide instructions on how to configure and manage Office 365 to enable SAML integration.
- Adding a domain to Office 365
- Adding the SaaS application to Seqrite ZTNA
- Configuring domain federation for Office 365 using a script
- Configuring domain federation for Office 365 manually
- Removing federation settings by executing the PowerShell command
- Accesing Office 365
1. Adding a domain to Office 365
To add the domain in Office 365, refer the following document.
Add a domain to Microsoft 365
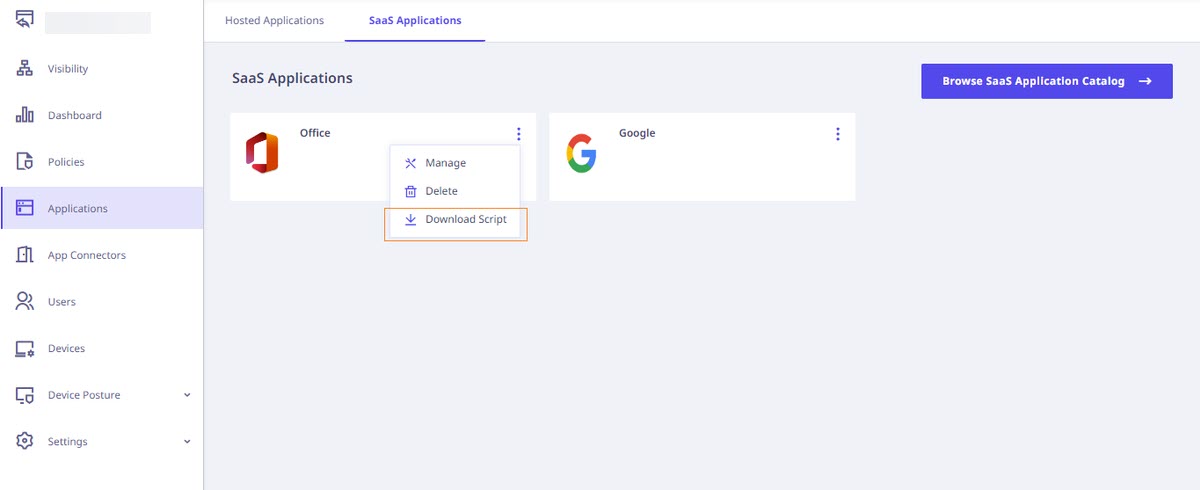
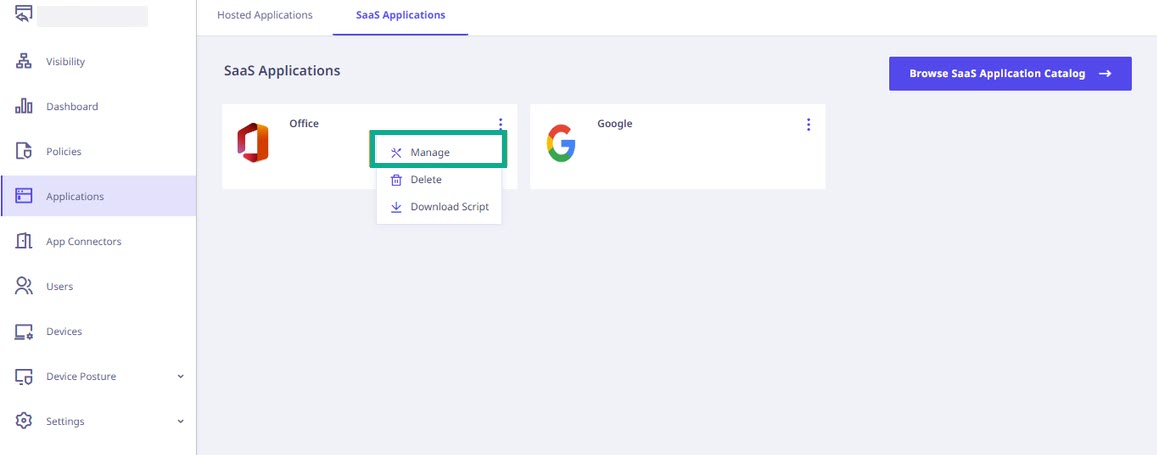
2. Adding the SaaS application to Seqrite ZTNA
To add the SaaS application follow these steps:
- Log into Seqrite ZTNA admin console.
- Navigate to the Applications section.
- Navigate to the SaaS Applications tab and click.
- To add Office 365 application click Browse SaaS Application Catalog.
- Click Add + of Microsoft Office 365 application card.
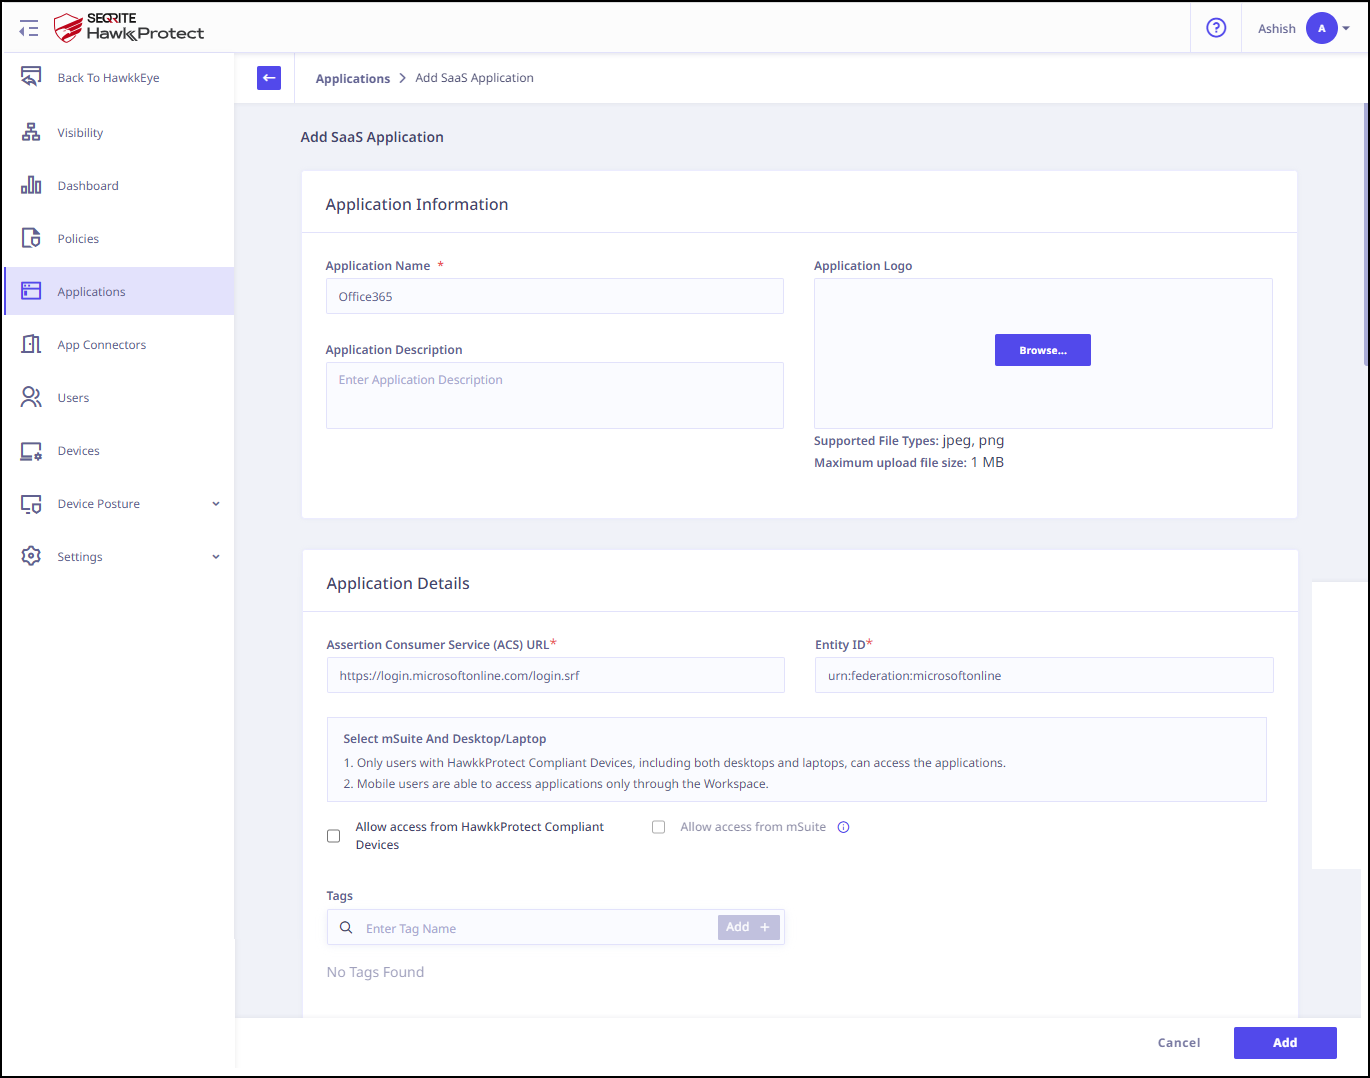
- Enter the Application Name. Provide the Application Description and Logo if any.
- Select the following checkboxes as appropriate to control access from managed laptops, desktops, or mobile devices.
- Allow access from registered Seqrite ZTNA-compliant devices:
Only users with registered Seqrite ZTNA-compliant devices (on which the Seqrite ZTNA agent is installed and active), including both desktops and laptops, can access the applications. - Allow access from Seqrite Workspace:
Mobile users are able to access applications only through the Workspace. To know more about accessing SaaS application through Seqrite Workspace, see Seqrite EMM Documentation.
- Allow access from registered Seqrite ZTNA-compliant devices:
- Click Add to add the application.
- When Azure AD is selected as an identity provider, it effectively blocks the capability to utilize Office 365 as a SaaS application.
- In case of custom SSL certificate, add CNAME record of Site DNS and shpsso.yourdomain.com in your domain’s DNS records.
Note ☛
3. Configuring domain federation for Office 365 using a script
To configure domain federation for Office 365 using a script, follow these steps:
- Download the configuration script from the pop-up menu of Office 365 application.
- Execute the downloaded script in Windows PowerShell with Administrator privileges.
- To configure domain federation for Office 365, select option 1.
- Enter the domain name you want to federate and the script will configure domain federation for Office 365.
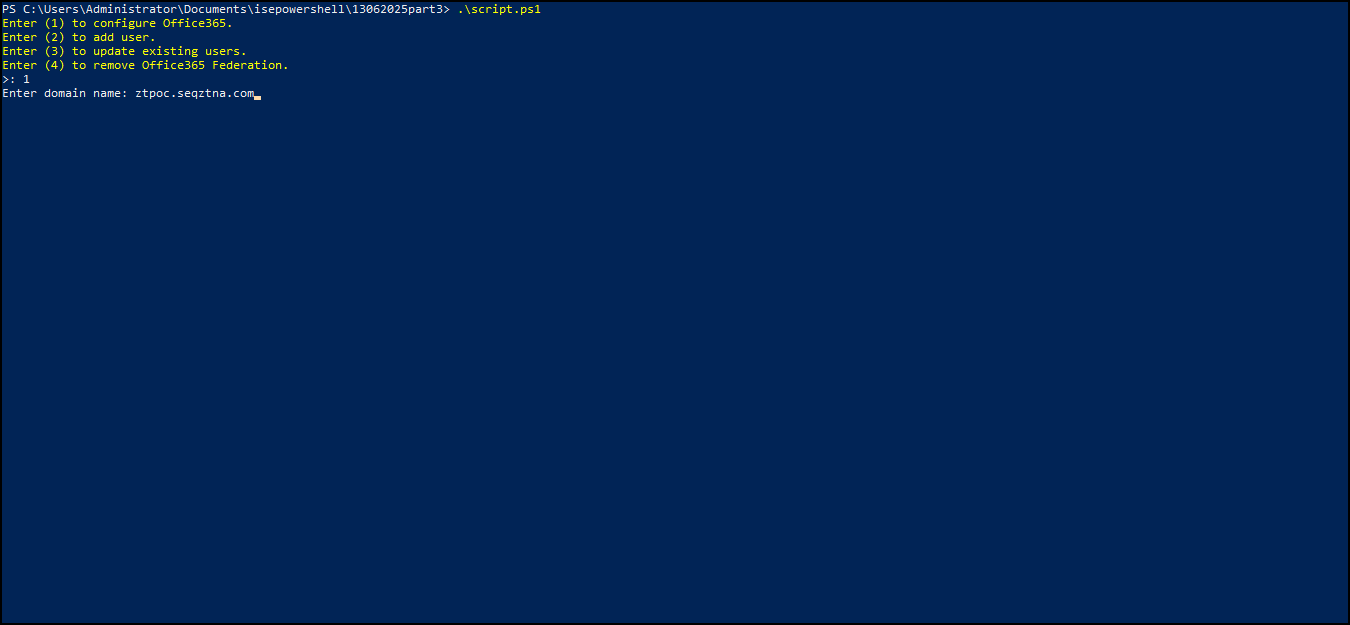
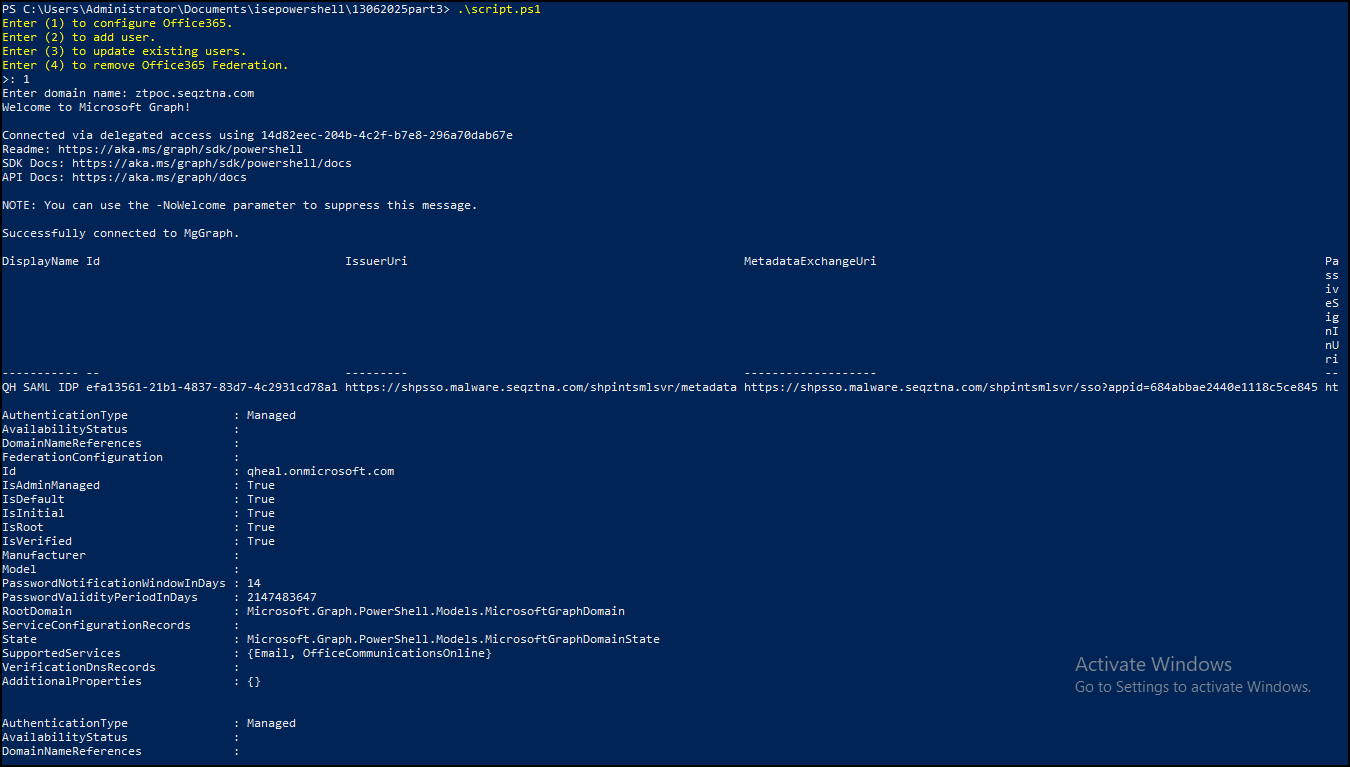
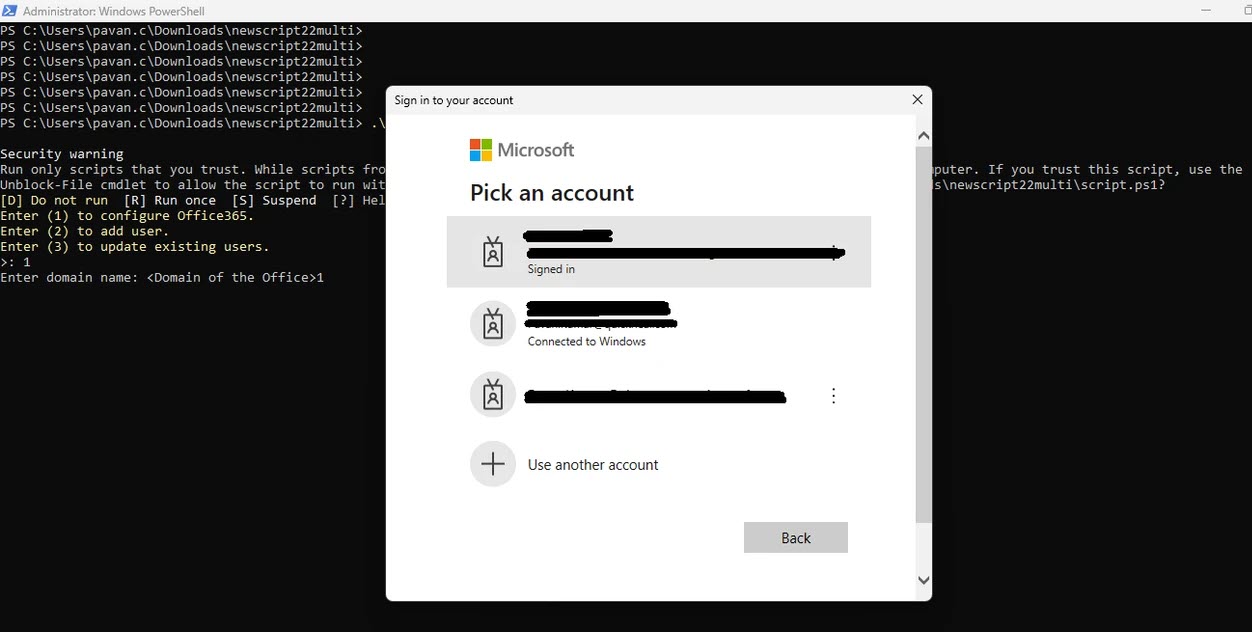
- PowerShell will prompt you to log into your Office 365 account. Use your onmicrosoft.com Email with Role of Global administrator to log in. Use your onmicrosoft.com admin email to log in.
- Enter the domain name you want to federate and the script will configure domain federation for Office 365.
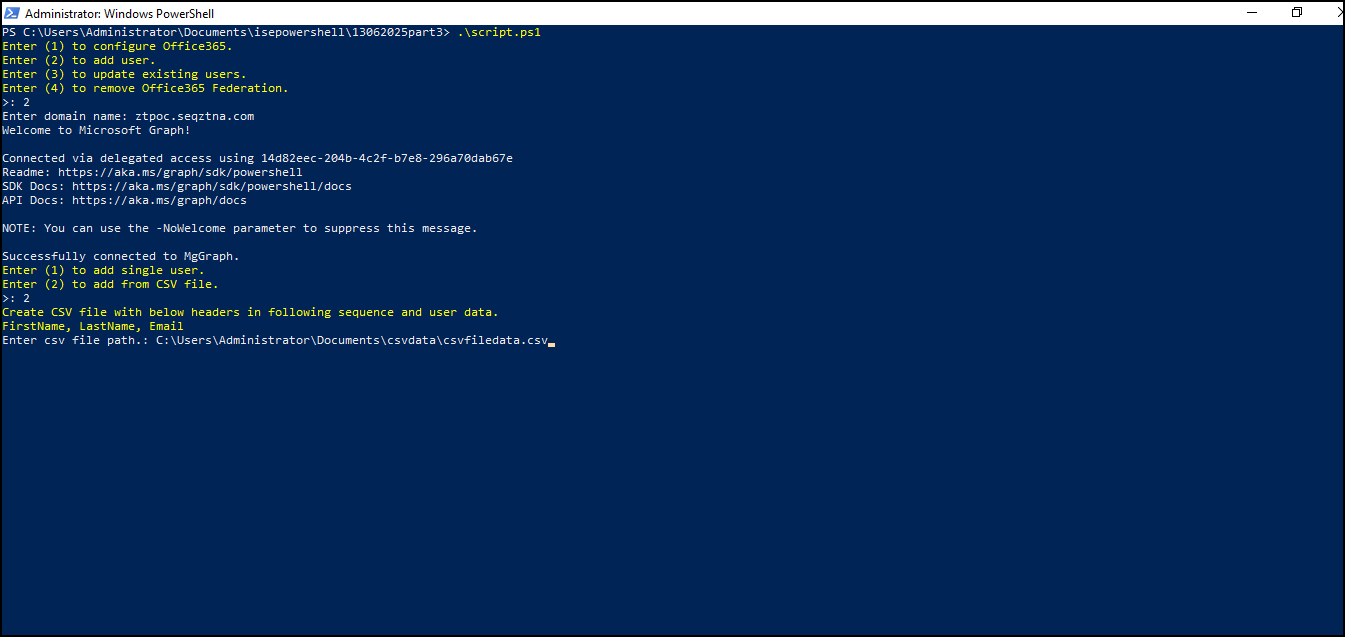
- To add new users under the federated domain in Office 365, select option 2.
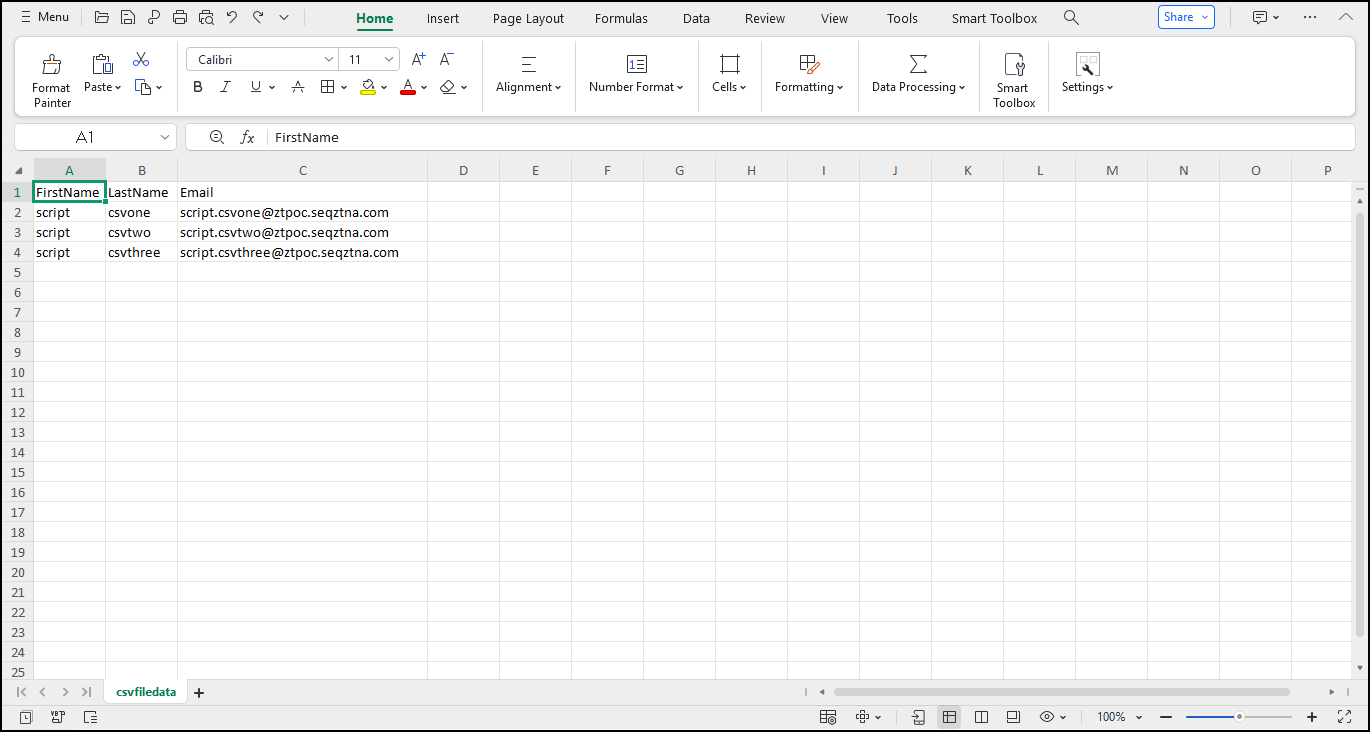
- Add a single user using PowerShell or upload a CSV file to add multiple users at once.
- Update existing users to work with a federated domain, select option 3.
-
If you run into any problems, you can execute this command to modify the execution policy of PowerShell, which allows the execution of scripts without any restrictions.
Set-ExecutionPolicy -ExecutionPolicy Unrestricted - Doc - The script must be executed for any modifications to be applied in the aforementioned three steps: Configuring Office, Creating New User, or Updating Existing Users.
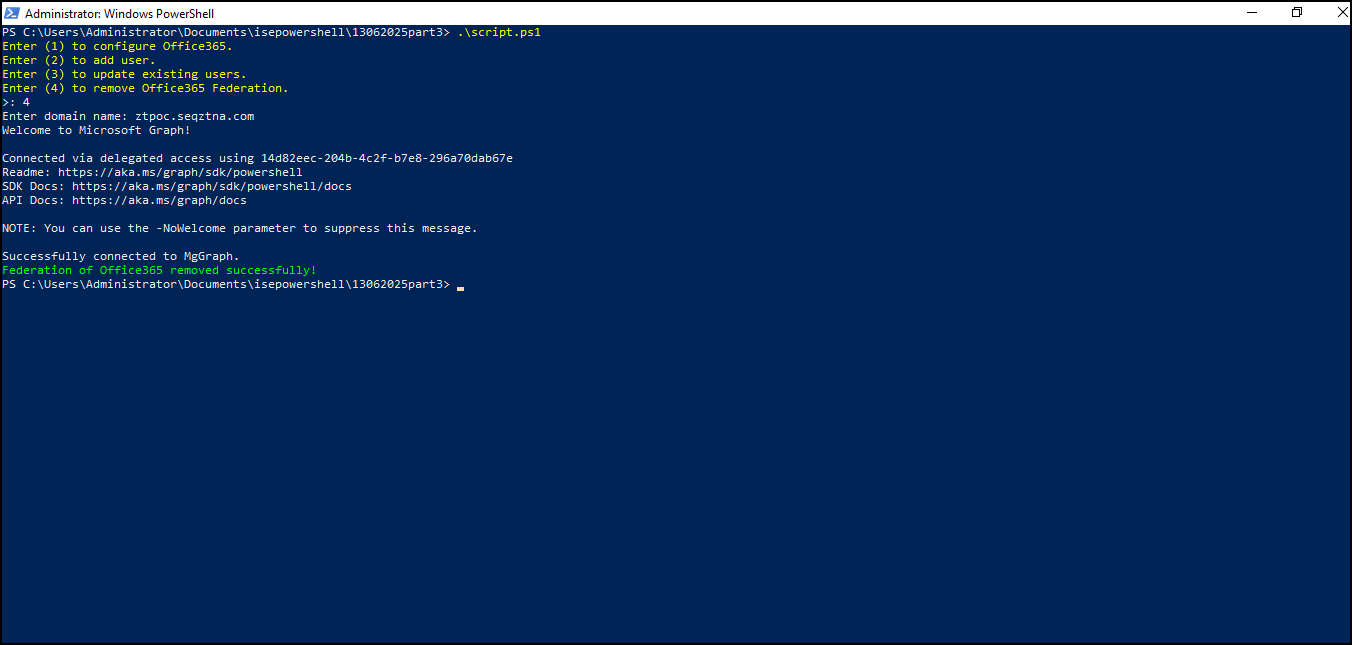
- To Remove the Federation Settings for the Above Configured Domain Execute Option 4.

Note ☛
4. Configuring domain federation for Office 365 manually
To configure domain federation for Office 365 manually, follow these steps:
- After adding the application, click the Manage option from the popup menu to check the SAML settings.

- Execute the below command in PowerShell Console with Administrator Permission Before performing the Further Steps.
- Install Mg-Graph Module by running below command on Windows PowerShell (Run as administrator)
- Connect to the Office 365 account using the following command: You need to log in using the administrator account in Office 365. Note that this admin account needs to be on a different domain than the one that will be federated, such as the Microsoft default domain (For Example, domain.onmicrosoft.com).
Connect-MgGraph - Run the following commands in PowerShell:
Note ☛
By selecting the Manage option in Office SaaS Application from the Admin portal you can access following values:- $passiveSignInUri: SAML Login URL
- $activeSignInUri – SAML Login URL
- $metadataExchangeUri – SAML Login URL
- $SigningCert – SAML Certificate
- $issuerUri – Issuer URL
-
Execute the following command to set up the above mentioned parameters. Ensure that the command runs without any errors.
# The domain you want to authenticate against SAML $domainToFederate = "Enter domain name" # Identify who your IdP is $federationBrandName = "QH SAML IDP" # Logon URL $passiveSignInUri = "https://shpsso.demo.seqriteztna.com/shpintsmlsvr/sso?appid=665b4df199c0f9c01ad56547" # Active Sign-In URL $activeSignInUri = "https://shpsso.demo.seqriteztna.com/shpintsmlsvr/sso?appid=665b4df199c0f9c01ad56547" # Metadata Exchange URL $metadataExchangeUri = "https://shpsso.demo.seqriteztna.com/shpintsmlsvr/sso?appid=665b4df199c0f9c01ad56547" # The IdP Certificate. Copy it on single line. $SigningCert = "Copy SAML signing certificate in single line" # The issuer URI. $issuerUri = "https://shpsso.demo.hawkkprotect.com/shpintsmlsvr/metadata/" $preferredAuthenticationProtocol = "saml" $federatedIdpMfaBehavior = "rejectMfaByFederatedIdp" - To confirm the successful configuration of the domain, execute the following command.
Get-MgDomain - The output should be like this:
ExtensionData : System.Runtime.Serialization.ExtensionDataObject ActiveLogOnUri : DefaultInteractiveAuthenticationMethod : FederationBrandName : seqhp.com IssuerUri : https://sso.idpdomain.com/metdata LogOffUri : https://sso.idpdomain.com/logout MetadataExchangeUri : NextSigningCertificate : OpenIdConnectDiscoveryEndpoint : PassiveLogOnUri : https://sso.idpdomain.com/sso PasswordChangeUri : PasswordResetUri : PreferredAuthenticationProtocol : Samlp PromptLoginBehavior : SigningCertificate : -----BEGIN CERTIFICATE-----MIICpDCCAYwCCQCEQp9behbD5zANBgkqhkiG9w0BAQsFADAUMRI wEAYDVQQDDAlsb2NhbGhvc3QwHhcNMjIwNDE5MTM0NTQ0WhcNMjMwNDE5MTM0NTQ0WjAUMRIwEAYDV QQDDAlsb2NhbGhvc3QwggEiMA0GCSqGSIb3DQEBAQUAA4IBDwAwggEKAoIBAQDvr3ZaFl+Jf9M4cpZ spTSi2kgWwSvYUMvpeJNFszHxzp7fS9XLn+8/UQALIu/ZjMKR7SmzUY45QppcnxLrvGrOw8hgfuDrb +BLqWCj3niHyYnTVPK3Kyxgkp/EaMEA0+98/iahjubUMYryLGvB9JTk3iAJL6I11u12fom1gz5Q RSkgbMp/+6AEtrvikR/2PV0XVfBWx1mMER8I78oxOSrHnfE248oG8qJZ7fq0jfZYFbsaap6WrT3Ulo 8uPU5sOTv+5I5dY2gBpCDesYUAKDimOvRLNq/169Q7CVy0KaA0hE1aIYlKAOfhw3hXzNVi0q9Pl0/s TVhfb3Fr/6ZFDAgMBAAEwDQYJKoZIhvQELBQADggEBAB/F0HiwHwZUJREXmrijDOtDpaOSQmGcv k3X3oJMnIAgRTJKHZHS1+oOdFXCENWiSsCF7cTbKvDrkf/Pa8nEzs79b42zQyB7MYl1VHzYwKcEZ4d qvbHmq7A09czazQLYCcIaobDOoCbjajccmmp6rRdobhhxvse0V1lWu/k4rdZiJbbjKjuOP2ZJbiK d2Qqv4JWehAK+1c7gXH1zJPelkejh7Rp2z5wqrkG4Sps/1qFZlLzDYmWlPDzQx/uvY26ebEpK7FUOP i03nJy1fz9s5PzResgmW8gEdbFDks/lzXNyD4Ef/wDtMYOnMlxx49UuWYmhEHV+NLq5msKIyc=- ----END CERTIFICATE----- SigningCertificateUpdateStatus : SupportsMfa : - To add the new users to the federated domain, execute the following command:
New-MgUser -PasswordProfile Martin@123 -UserPrincipalName martin@yourdomain.com -DisplayName "Martin Powell" -GivenName Martin -Surname Powell -AccountEnabled -MailNickName Martin - To update the existing users to work with the federated domain, execute the following command:
Update-MgUser -UserId martin@yourdomain.com -OnPremisesImmutableId martin@yourdomain.com
Set-ExecutionPolicy -ExecutionPolicy RemoteSigned -Scope CurrentUserInstall-Module -Name Microsoft.Graph -Scope CurrentUser -Repository PSGallery -Force - Add a single user using PowerShell or upload a CSV file to add multiple users at once.
5. Removing federation settings by executing the PowerShell command
To remove federation settings, run the following PowerShell command.
Update-MgDomain -DomainId $domainToFederate -AuthenticationType Managed6. Accessing Office 365
Office 365 can be accessed in two ways:
- Outside the user portal
- From the user portal
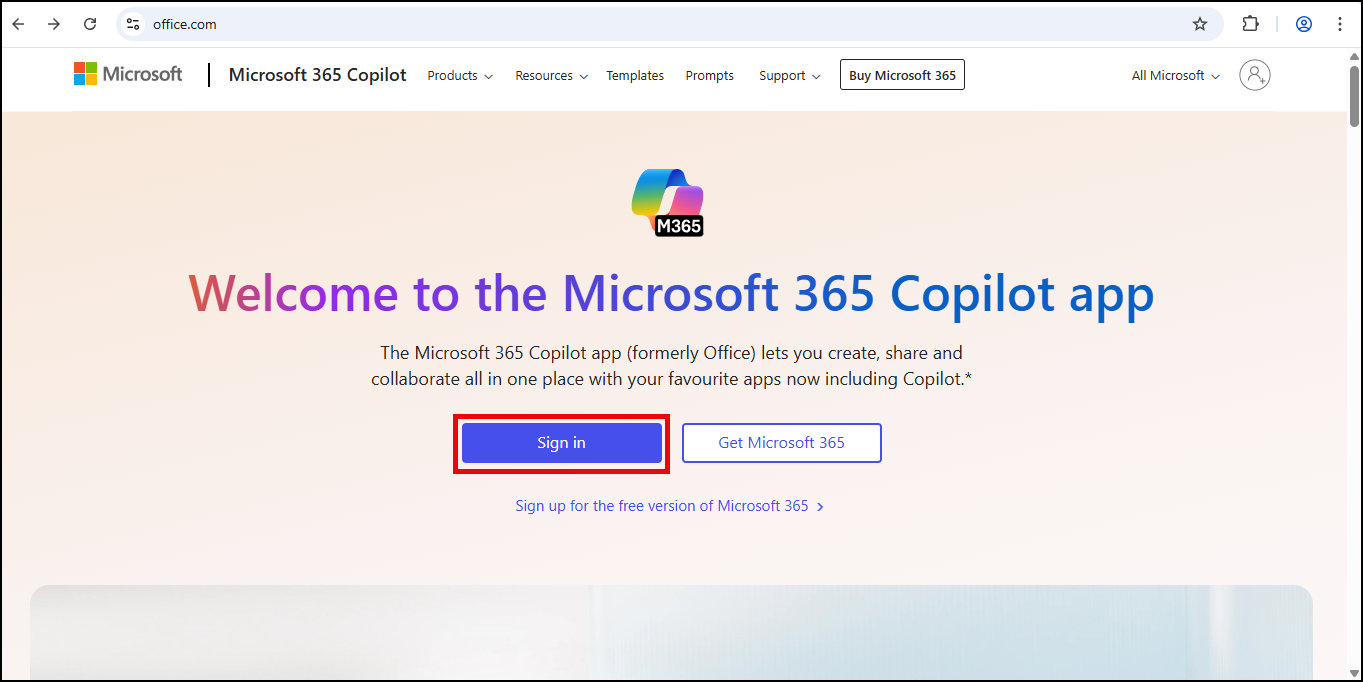
Accessing Office 365 Outside the User Portal
To access the Office 365 out side the user portal, follow these steps:
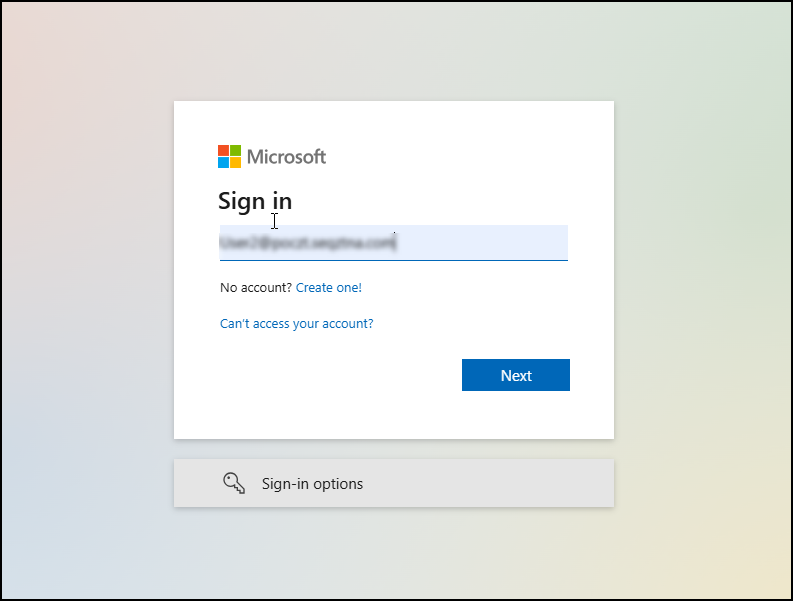
- On the www.office.com, click Sign In.
- Enter user ID and click Next.
- Click OPEN USER PORTAL.
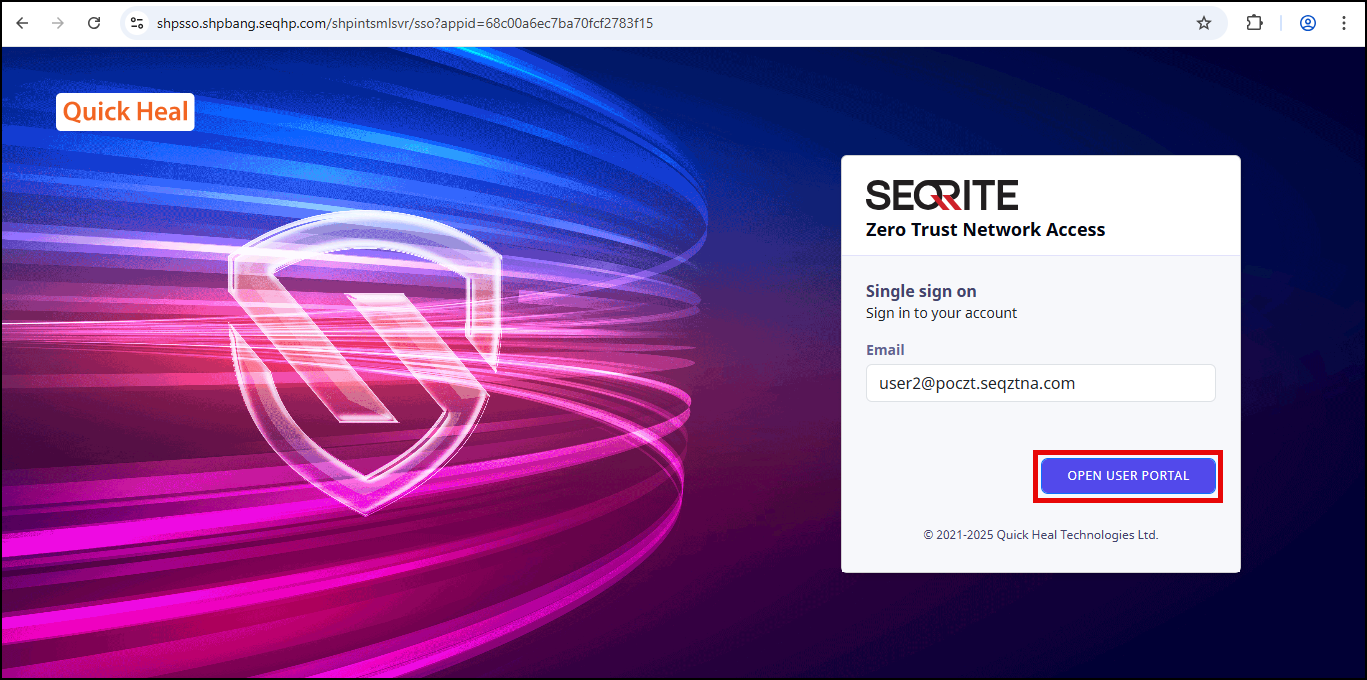
The ZTNA Access Account page is displayed.
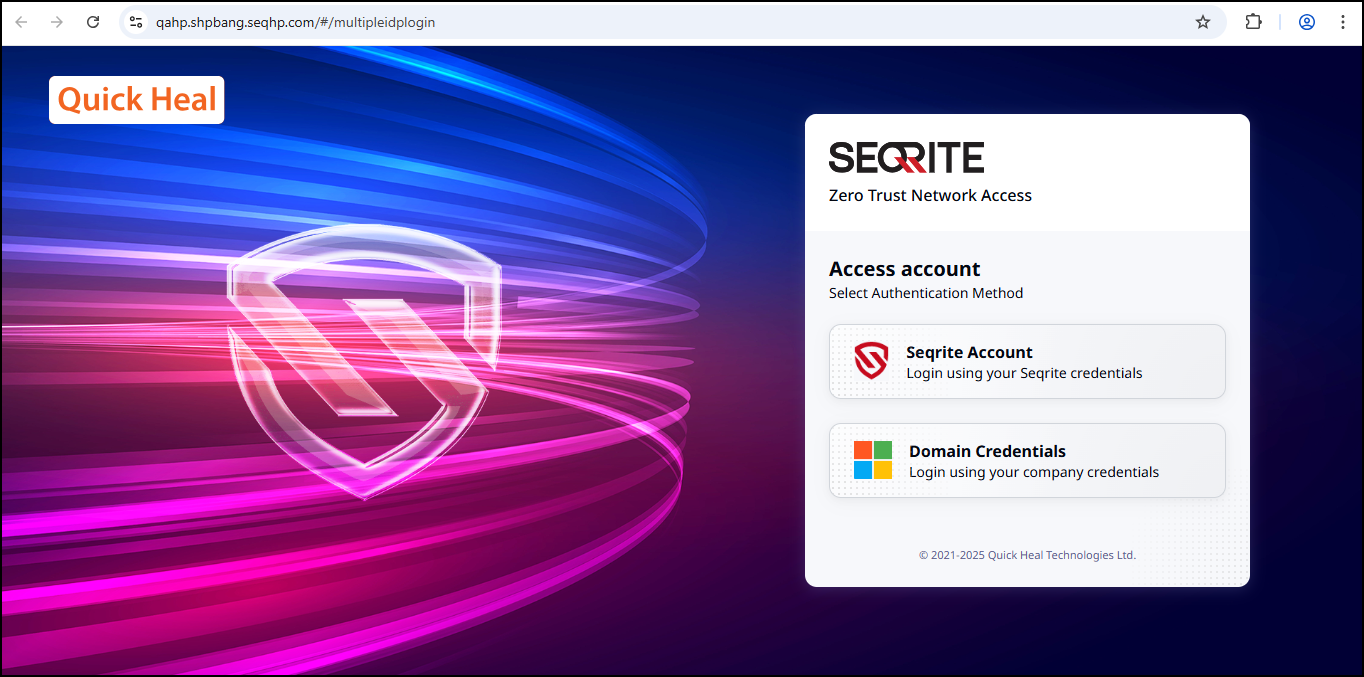
- If both Seqrite IDP and AD IDP are configured, users will see two login options and can choose how to proceed.
- If only one IDP (either Seqrite or AD) is configured, the login page will automatically redirect to the username and password screen without showing any options.
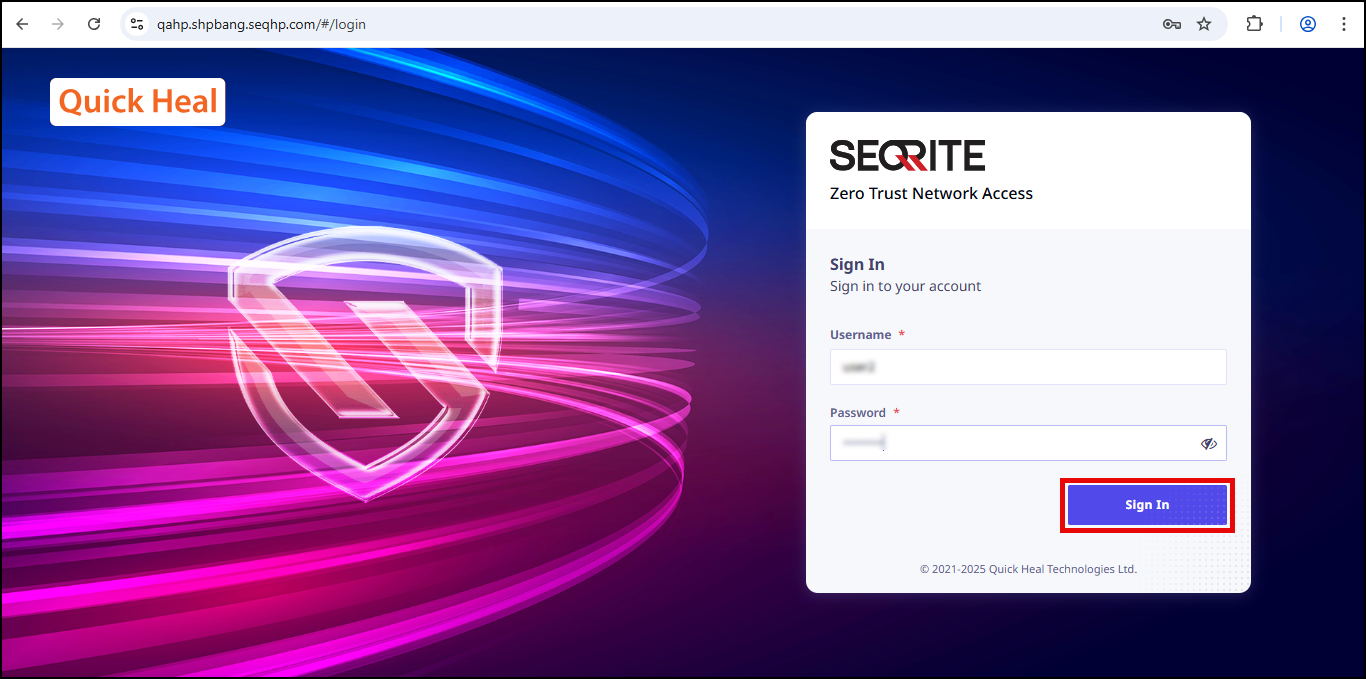
- Click Domain Credentials, enter username and password, click Sign In.
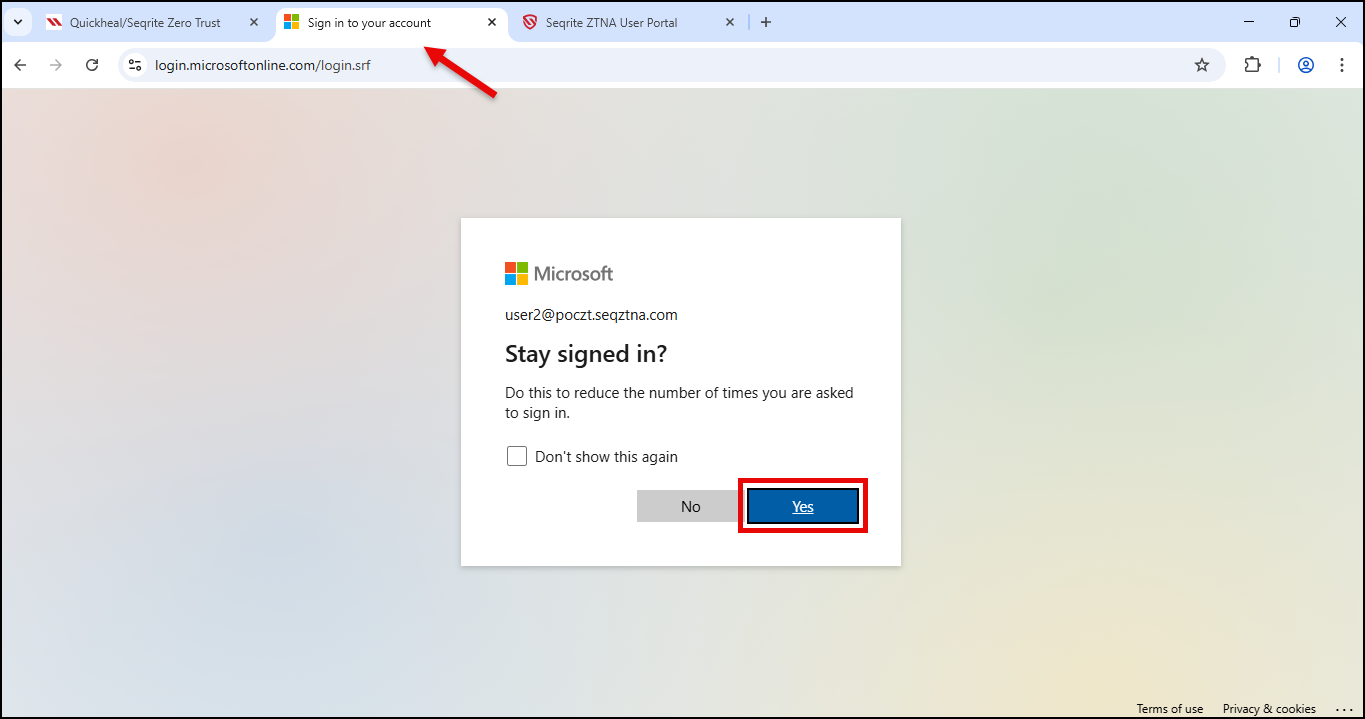
- Once the user portal is authenticated, click the Sign in to your account tab and click Yes.
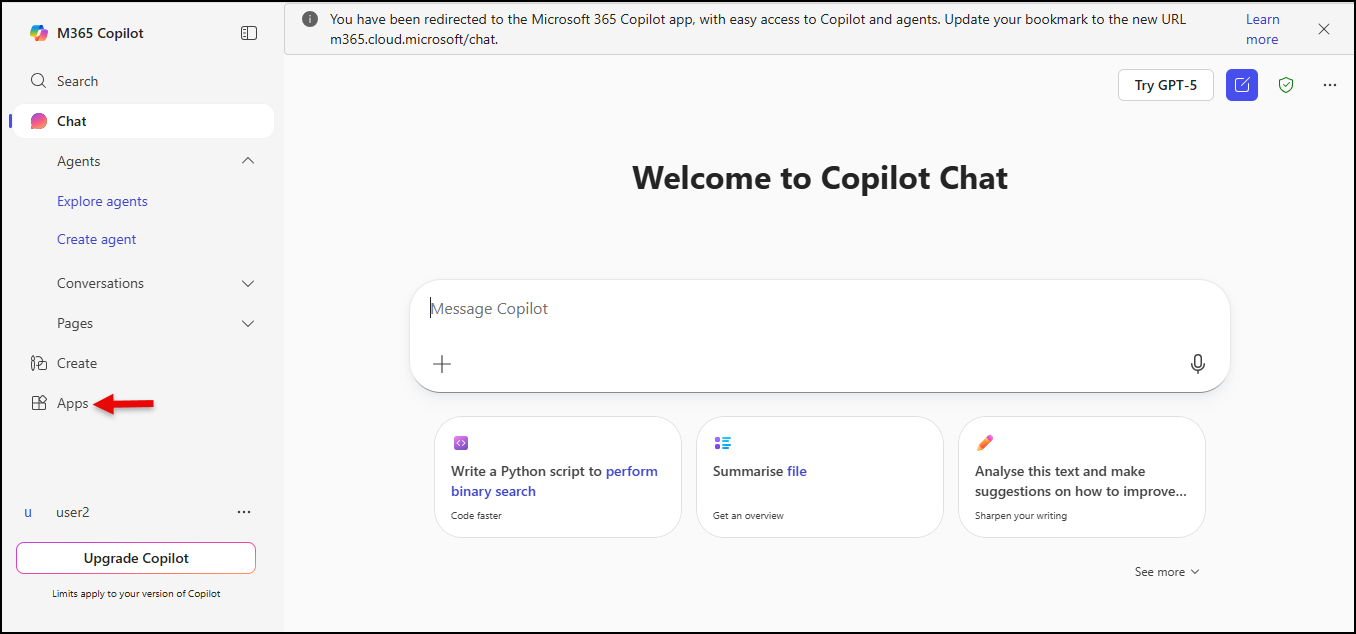
- Click Apps to access Office 365 apps.
The ZTNA Single sign on page is displayed.
Note: The login options shown to users depend on the admin configuration in the Zero Trust Admin Console under the Sites page.
Office 365 dashboard is displayed.
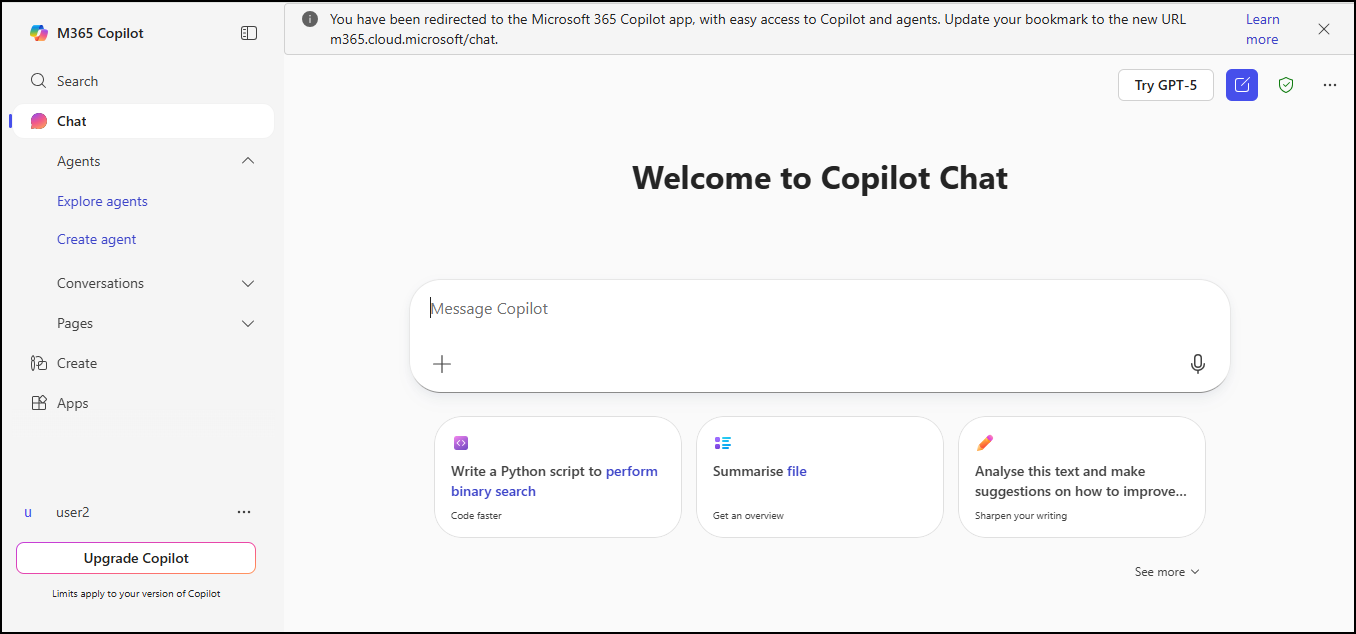
In this way you can access Office 365 outside the user portal.
Accessing Office 365 from the User Portal
To access the Office 365 from the user portal, follow these steps:
- Login to Zero Trust portal, click Domain Credentials.

- Enter credentials and click Sign In.
User portal dashboard is displayed.
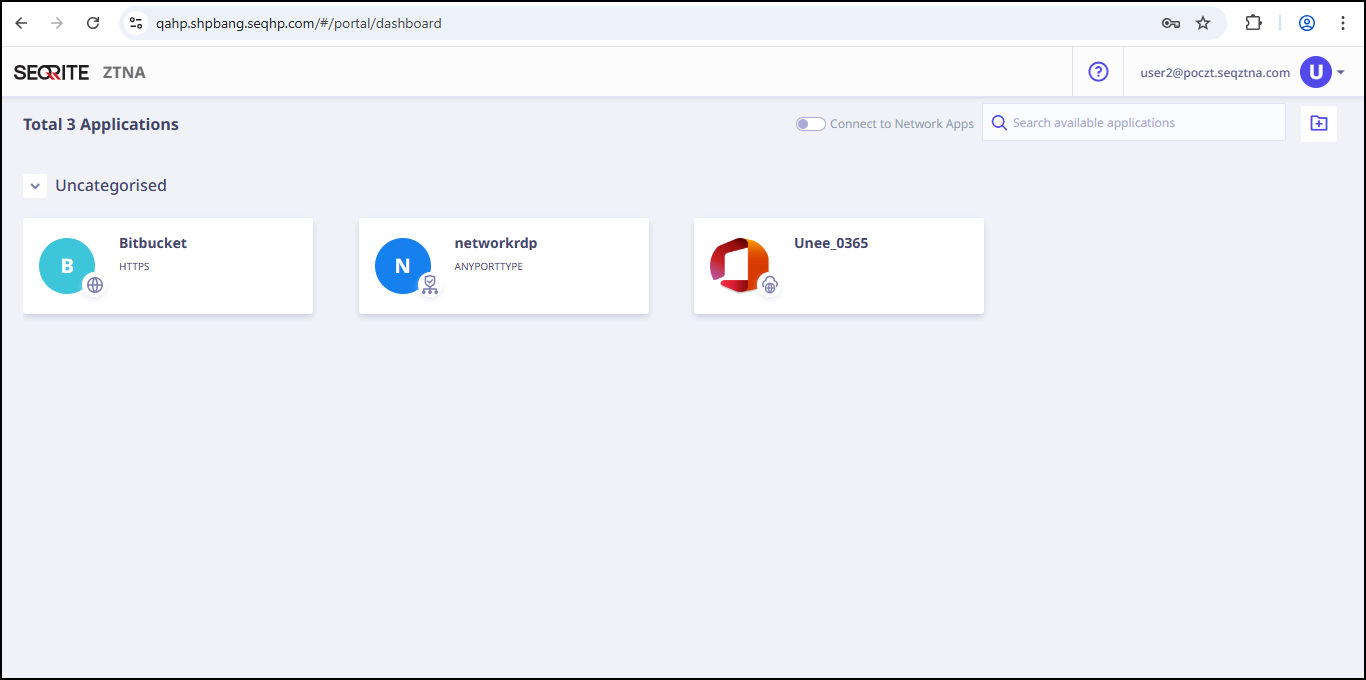
- Click Unee_O365.
Office 365 page is displayed. - On the www.office.com, click Sign In.
- Enter user ID and click Next.
- Click OPEN USER PORTAL.
A new tab with user portal dashboard is open.
Note:You can close this tab, as user portal dashboard is already open. - click the Sign in to your account tab and click Yes.
Office 365 dashboard is displayed.
- Click Apps to access Office 365 apps.
The ZTNA Single sign on page is displayed.
In this way you can access Office 365 from the user portal.
- To configure domain federation for Office 365, select option 1.
Important ☛
Ensure that the domain you intend to federate is not set as the default domain before executing the script.Navigate to the Office 365 Admin Center and access the domain section. Set the default domain to a Microsoft domain (For Example, domain.onmicrosoft.com).