Prerequisites for App Connector Installation
To successfully install the App Connector, make sure your endpoint machine meets the following requirements.
- Docker Installation
- Docker Service Running
- Curl Installation
- Whitelisting URLs
- Status of the Docker Engine and the App Connector
- App Connector Log Timestamp Format
Note: If the customer have any proxy/firewall setup, they need to whitelist the ” Site URL ” for the ZTNA
Docker Installation
Important Links
Docker provides a platform for running containerized applications and is essential for the functioning of the App Connector. Docker must be installed on your endpoint machine with a version of 20 or above. The installation path for Docker may vary based on your operating system, and it should be one of the following options.
-
Unix-like Systems (Linux, macOS)
/usr/bin/docker
/usr/local/bin/docker
/var/lib/dockerNote: ☛
It is not recommended to install Docker under the directory /etc/docker/.Note: ☛
It is not advised to use same machine for agent and app connector. Please use different machines. /etc/docker/.
- Windows Systems
C:Program FilesDockerdocker.exe
C:Program FilesDockerdocker.
Docker Service Running
Ensure that the Docker service is running on your machine. The App Connector relies on Docker to create and manage containers, so it is crucial to have Docker up and running before proceeding with the installation.
Curl Installation
Install Curl on your endpoint machine. Curl is a command-line tool used to transfer data to and from servers using various protocols. The App Connector utilizes Curl for certain operations, so it must be installed to ensure proper functionality.
For Linux, it is recommended to to use the command sudo apt install curl to install curl. This ensures the creation of the logs folder within the “Seqrite ZTNA_App_Connector” folder and correct installation of the App Connector.
This is necessary because in some machines, curl is installed using "snap", which leads to the logs folder not being created within the “Seqrite ZTNA_App_Connector” folder and improper installation of the App Connector.
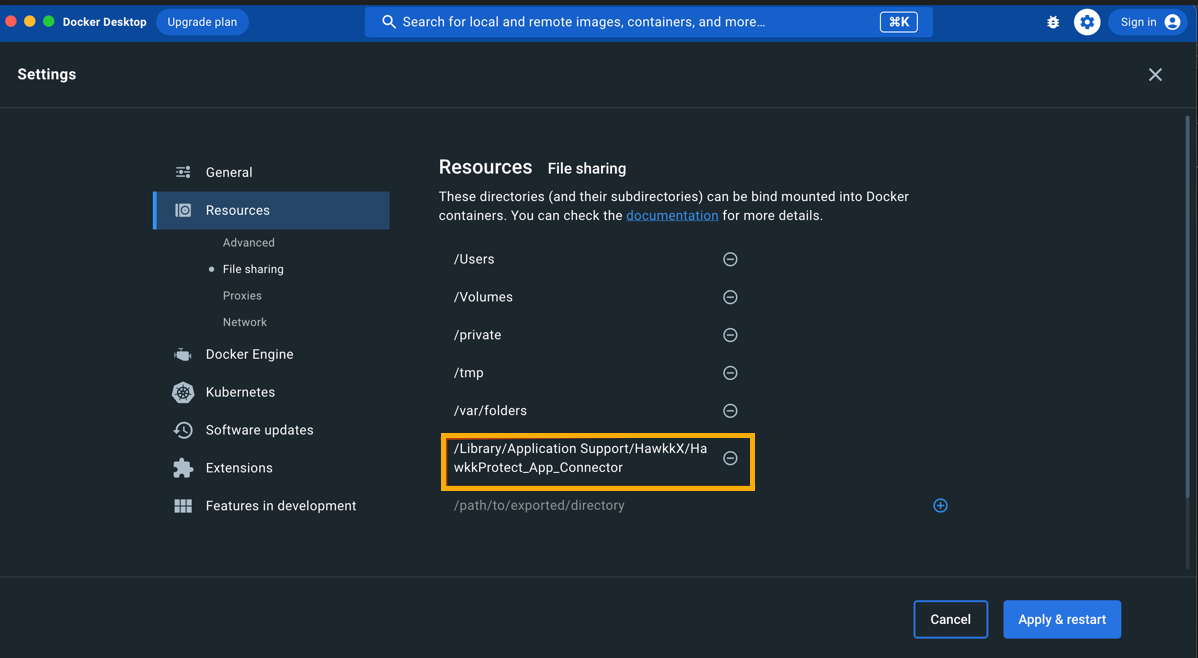
For macOS, it is necessary to add the path /Library/Application Support/HawkkX/HawkkProtect_App_Connectorr/ in the settings of Docker Desktop under Resources > File Sharing. This step is a prerequisite to enable proper file sharing with the Seqrite ZTNA_App_Connector. By adding this path, you ensure that Docker Desktop can access the required files and directories within the Seqrite ZTNA_App_Connector for seamless operation.
Refer this image for more details.
Whitelisting URLs
- https://shp-acscomm.seqrite.com
- https://cbssecured.seqrite.com
- https://cbsdevice.seqrite.com
- https://35bhfv3atb.execute-api.ap-south-1.amazonaws.com
- https://dlupdate.quickheal.com
- https://download.quickheal.com
Status of the Docker Engine and the App Connector
Make that the App Connector and the Docker Engine are running before starting any upgrade processes. This guarantees the upgrade’s compatibility and smooth operation. Before performing any upgrades, it is crucial to check the status of the Docker Engine and ensure that the App Connector is operational.
App Connector Log Timestamp Format
The timestamp format in the App Connector logs remains consistent as IST across all countries.
App Connector Installation
Select one of the following methods to install the App Connector as applicable.
- Standalone Installation
- Remote Installation
Standalone Installation
With this type of installation the administrator can install the App Connector on a single endpoint, which supports operating systems like Windows, Mac, and Linux.
To perform a Standalone Installation, follow these steps.
- Click Download Installer to download the Standalone Installer.
- Run the Installer.
- After installation, the App Connector will appear under the App Connectors Tab with an "unassigned" status. Administrators can then assign a group to the newly installed App Connector.
Remote Installation
Remote Installation provides the flexibility to deploy the App Connector simultaneously on multiple endpoints, including Windows, Mac, and Linux operating systems (OS).
To perform a Remote Installation, follow these steps.
- Download the Remote Installer Tool.
- Run the Installer Tool.
- You can start the Remote Installation process in either of the following ways,
a. Add endpoints by selecting from the list and clicking Add.
b. Add endpoints by specifying the IP Address or IP Address Range. - In the ‘Add User‘ dialog, enter the User Name and Password with Administrator privilege.
- Click Finish to add all selected endpoints to the installation list.
- Click Install to begin the installation process.
- After installation, the App Connector will appear under the App Connectors Tab with an "unassigned" status. Administrators can then assign a group to the newly installed App Connector.
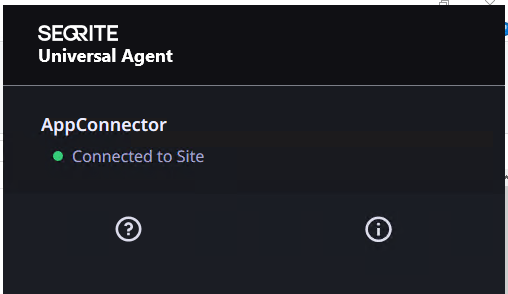
You may verify the status as "connected" upon successful connection by referring to the system tray pop-up, as demonstrated in the following image.