
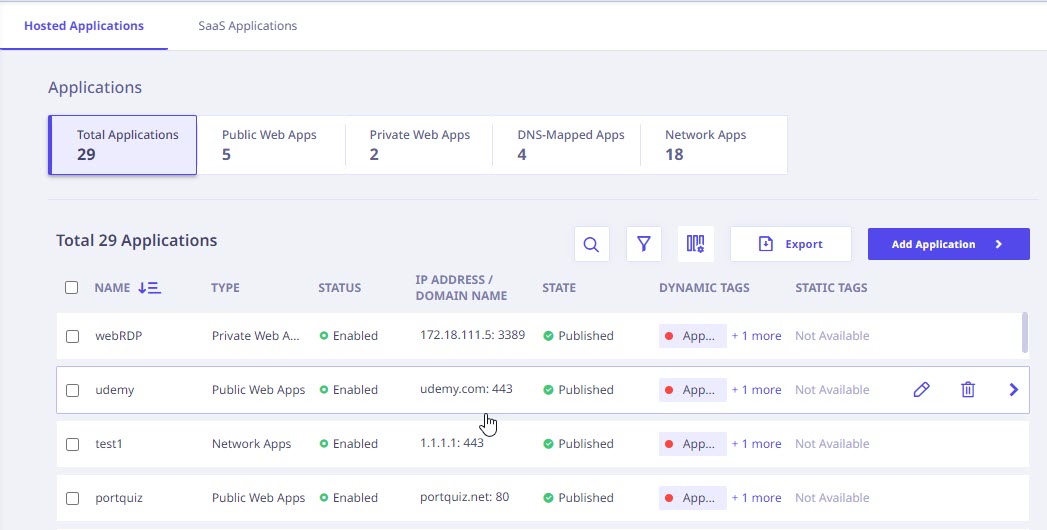
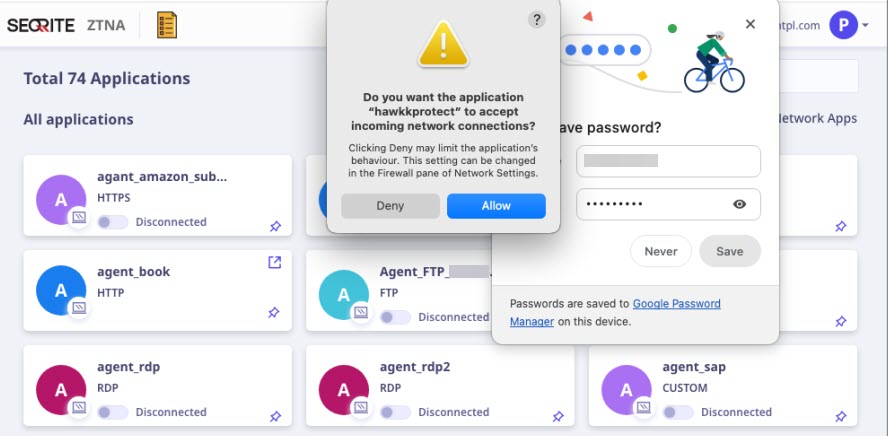
This page shows all the applications within the organization whose access has been restricted for users. You can configure and add new applications as well.
When the administrator adds organizational site, a corresponding application ‘ZTNA Apps Portal’ is created using site details. Administrator can use this default application in the Firewall and DDoS policy. The administrator cannot delete or edit this application.
Further, the following details for all the applications is displayed.
| Column Name | Description |
|---|---|
| Name | Name of the application. |
| Description | Description of the application. |
| Type | Type of application. |
| Status | Status of the application. (If the tenant has an automatically generated certificate, this column will be available.) |
| IP Address / Domain Name | The web address/ domain name. |
| Port Value | Port Value. |
| State | State of the application. |
| External Domain Name | External Domain Name of the application server. |
| Relative URL Path | Relative URL Path. |
| Status | Status of the application (Active/Inactive). |
| Protocol | Protocol of the application. |
| WAF Rules Applied | List of all the applicable WAF Rules. |
| Host Header | It is an HTTP header that specifies the domain name or IP address of the target server in a client’s request. |
| Origin Header | It is an HTTP header that indicates the source or origin of a request. |
| Tags | The static and dynamic tags based on which access to the application is granted. The option to update static tags is also available within the details panel on the right. |
| Search | To search applications by their name. |
| Add Filter | To add a filter. To know more, refer the Adding a filter to refine the view section on Visibility page. |
| Export | To export the information displayed on this page in CSV file format. |
| Add Application | To add an application. |
Note ☛
If a site is deleted, all the related applications on Application Catalog page become inactive. To make these applications active again, edit the applications and update the domain name. This is applicable only for auto-generated certificates.
Actions available with applications
When you hover over each application, the following options appear in the column next to Tags.
| Action Icon | Action Label | Description |
|---|---|---|
 |
Edit | To edit the application details. |
 |
Delete | To delete the application profile. |
| Side bar | To view the details of the application. |
- The applications can be sorted alphabetically by clicking the sorting symbol next to Application Name column.
- Bulk action: Select the checkboxes in front of the application names to perform bulk delete action on selected applications.
Note ☛
Only one tag is shown for each application. You can hover over the blue colored text next to the tag to view additional tags, if any.
When you click an application name, the following details are displayed in the right pane.
| Application Details | |
|---|---|
| Name | Description |
| Name | Name of the application. |
| Description | Description of the application. |
| Type | Type of application. |
| IP Address / Domain Name | The web address/ Domain Name. |
| Port Value | The port number. |
| External Domain Name | External domain name for the application. |
| App Connector Group | The app connector that will be used to connect applications hosted on premises to site hosted on cloud environment. |
| Status | The status of the application (Enabled/Disabled). |
| Protocol | The protocol of the application. |
| Tags | The tags applied to an application. You can find an option to remove Static tags from the “Application Details” section in the right sidebar of the application page. |
| Actions and Status | |
| Name | Description |
| Enable/Disable Application | You can use the toggle button to activate or deactivate the application.
|
| Test Connection Button | To confirm the connection status between the active app connector and the application, click ‘Test Connection’. When the connection is successfully established, it will be denoted as ‘Reachable’, accompanied by a message stating “The application is reachable via the <name of the app connector>”. Otherwise, it will be labelled as ‘Unreachable’. Test connection option is available only for private apps and agent-based apps. |
Adding an application
To add a new application in the application catalog, follow these steps.
Note ☛
The application addition process offers a “Save as Draft” feature. This mode allows users to save their application in an unfinished state, preserving their progress for future editing and refinement.
- Log on to the Seqrite ZTNA portal. Navigate to Application Catalog in the left navigation pane.
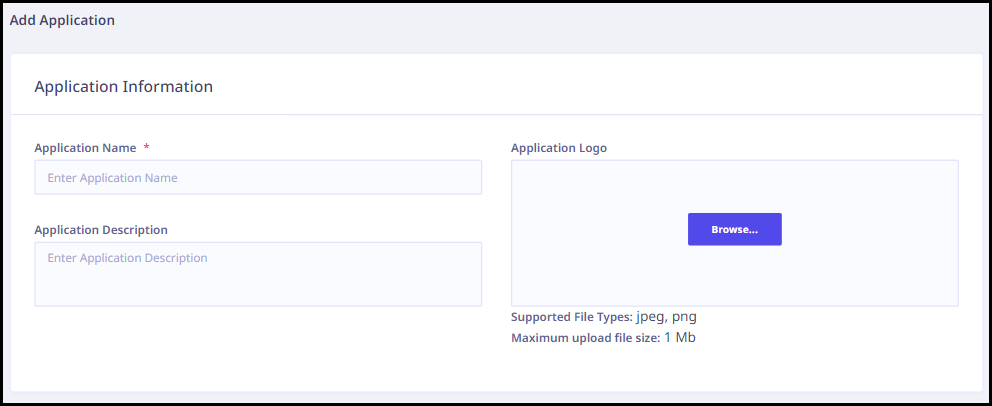
- On the Application Catalog page, Click Add Application. A new page appears.
- Enter the following information in the Application Information section.
- Enter the Application Name.
- Enter the Application Description.
- Upload the application logo.
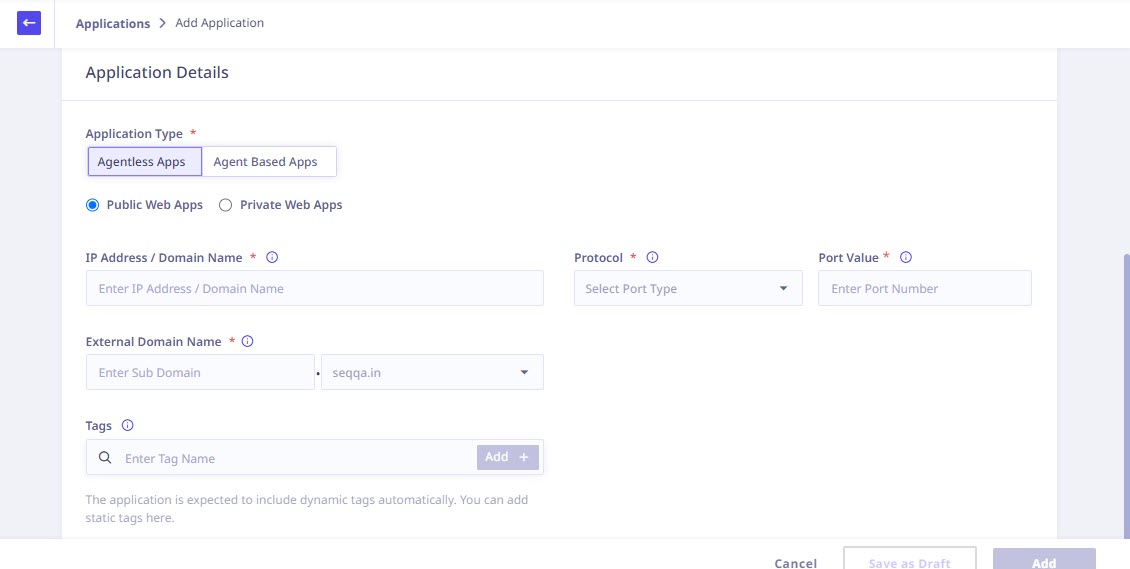
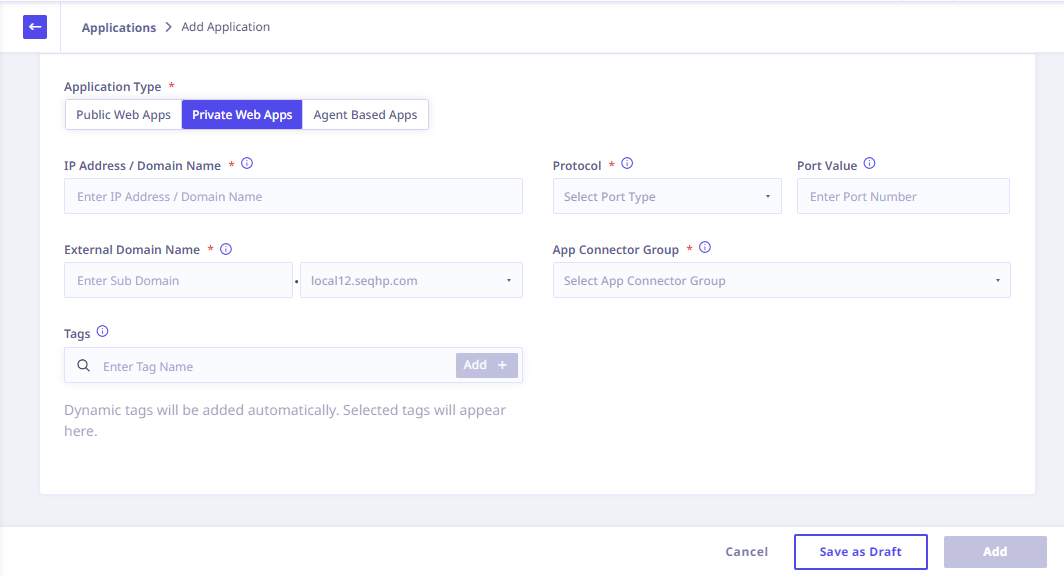
- Enter the following details and select appropriate options (wherever applicable) in the Application Details section.
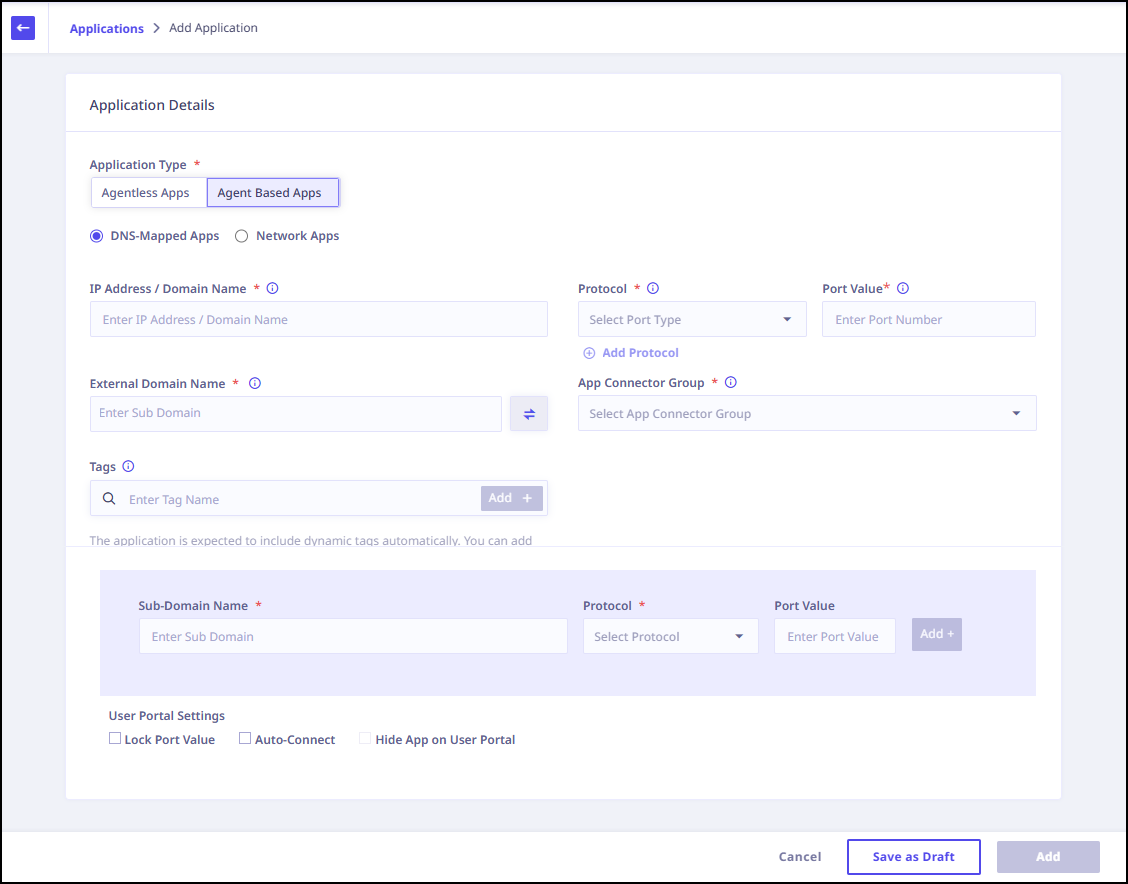
- Select one of the application types.
- Agentless Apps
- Public
- Private
- Agent-Based Apps
- Network Apps
- DNS-Mapped Apps
- Agentless Apps
- The use of passphrases to generate private keys is not supported.
- At present, the only supported method for authentication to WebSSH applications is through private key files encrypted with RSA.
- IP Address or Domain Name: Enter the IP address or domain name of the application.
- Protocol: Select the appropriate protocol from the dropdown menu. Administrators have the flexibility to assign multiple ports and protocols to each application.
Note: When HTTPS is the chosen protocol, administrators should specify the Domain Name rather than the IP address. The external domain name will be automatically populated. - External Domain Name: Enter the external domain name. This domain name will be accessed directly by end users through the user portal. Click
 to make External domain same as internal domain.
 - App Connector Group: Choose the relevant App Connector Group from the dropdown menu.
- Tags: Assign any relevant tags that apply to the application.
- You have the option to configure the following additional parameters based on your requirements:
- Sub-Domain Name: Utilize sub-domain names to enhance application structuring and organization.
An application accessible through the parent domain could be redirected to another domain internally. These internal redirects do not get accessed through the Seqrite Universal Agent unless explicitly configured in the sub-domain section of the additional parameters.In order to securely access all the domains of the parent domain through the ZTNA agent, add these domains to the sub-domain section.
For example:
If we access the website https://documetation-example.com and the website loads and provides URLs to retrieve images from another website, https://documentaiton-images.com. In this scenario, the application URL would be https://documentation-example.com and the sub-domain would be https://documetation-images.com. - Protocol: Determine the communication protocol to be employed for data transfer.
- Port Value: Establish the port value for streamlined data routing and connectivity.
- Sub-Domain Name: Utilize sub-domain names to enhance application structuring and organization.
- User Portal Settings: Customize access controls and personalize the user experience with the following options.
- Lock Port Value: Secure a specific port number to prevent unauthorized changes.
The user would connect to the port configured in the application and not a random port. For example, if the admin configured the application for port “8080” then the user would access the application on the same port. Without the Lock Port Value configuration, the user could connect to a random port (for example: 10450 and then internally it would redirect to the application port 8080). - Auto-Connect: Enable automatic connection establishment for user convenience.
On successful end-user authentication, the application connection will be automatically established for user convenience. - Hide App on User Portal: Simplify the user experience by concealing the applications for which the Auto-Connect option is enabled within the user portal.
This is an advanced configuration and should be done only when the end users have clear awareness of the accessible applications.
- Lock Port Value: Secure a specific port number to prevent unauthorized changes.
- Enable HTTP/2
With HTTP/2, loading times for websites are enhanced by reducing the latency and overhead associated with multiple requests. - Bypass Authentication
Bypass Authentication lets you get into apps directly without needing to log in through the user portal. You can get a complete overview of all the applications with Bypass Authentication enabled by accessing the WAF section on the Dashboard Page.Note ☛ Access to the Bypass Authentication option is exclusive to users who have purchased the add-on for either Enterprise or Standard licenses.
- Relative URL Path
If the selected protocol is either HTTP or HTTPS, you must install the plugin before using relative paths in the application. After updating the relative path in the application, refresh the portal, reconnect, and changes will appear. Relative paths in logged-in agent apps are blocked when accessed, but not if logged in another tab. - Default Landing Path
The default landing path for an application refers to the initial page or screen that users encounter when they first access the application. With the default landing path set and Restricted Access Path enabled, users are limited to accessing only the landing path and are restricted from accessing other paths within the application domain. ZTNA provides built-in support for a default landing path, for cases where an application’s landing page is hosted elsewhere.Note ☛ The Restricted Access Path option is exclusively supported for the Default Landing Path.
- Network Settings in Sites: In a specific scenario where UDP applications are being configured, it's essential to also establish TCP applications. This is because TCP is initially used to establish a connection, followed by a transition to UDP for communication. Moreover, for UDP applications to operate, virtual IP pools are utilized to dynamically assign IP addresses to agent devices accessing network applications. Each Seqrite ZTNA Agent will be allocated a singular IP address from the virtual IP pool for accessing network-based applications.
- App Connector Settings: For seamless access to UDP applications, ensure the App Connector is correctly installed and connected. Configure the LAN Subnet field within the app connector to enable access to diverse UDP applications. You have the option to enable or disable NAT according to your requirements. NAT facilitates the translation of private LAN IP addresses into public ones for internet communication, and vice versa, enhancing connectivity.
- Ubuntu 22.04 and above
- Kernel version > 4.5
- ufw route allow out on tun0: To allow traffic from the application to the app connector's Docker instance.
- ufw route allow in on tun0: To allow traffic from the app connector's Docker instance to the application.
- The
iptablesutility should be installed in your Linux host with the help of the appropriate package manager.- For Debian-based systems, you can use the following command:
apt-get install iptables - For RHEL-based systems, you can use the following command:
yum install iptables
- For Debian-based systems, you can use the following command:
- After successfully installing the utility, run the following commands to allow traffic flow:
- iptables -I FORWARD -i tun0 -j ACCEPT: To allow traffic from the app connector's Docker instance to the application.
- iptables -I FORWARD -o tun0 -j ACCEPT: To allow traffic from the application to the app connector's Docker instance.
- Install Required Windows Updates:
- Install the following updates on your Windows 7 VM:
- KB4490628
- KB4474419
- Install the following updates on your Windows 7 VM:
- Download and Install OpenVPN:
- Download OpenVPN version 2.4.12 for Windows 7 from OpenVPN Community Downloads.
- Run the installer (
openvpn-install-2.4.12-I601-Win7.exe) with administrator rights.
- Install OpenVPN:
- Open Command Prompt or PowerShell with administrator rights.
- Navigate to the directory where
openvpn-install-2.4.12-I601-Win7.exeis located. - Execute this command to install OpenVPN silently (without shortcuts, GUI, associations, or OpenSSL utilities):
openvpn-install-2.4.12-I601-Win7.exe /S /SELECT_SHORTCUTS=0 /SELECT_OPENVPNGUI=0 /SELECT_ASSOCIATIONS=0 /SELECT_OPENSSL_UTILITIES=0
- Rename the TAP Adapter:
- Navigate to Control Panel > Network and Internet > Network Connections.
- Find the network adapter named "TAP-Windows Adapter V9".
- Right-click on it and choose "Rename".
- Rename it to "ZT Network Adapter".
- Install Any Required Agent:
- If your network-based applications require a specific agent or software for connectivity, install it on your Windows 7 VM.
- Access Network-Based Applications:
- After completing the above steps, you should be able to access your network-based applications via the network connection established by OpenVPN.
-
After this is done, click Add. The Applications page is displayed with the application details that you have configured.
Depending on the application type that you select, relevant parameters are displayed.
Public Web Apps
Setting Up Public Web Apps
To configure public web applications, provide the following application details:
1. Application Details
| Field | Description | ||
|---|---|---|---|
| IP Address or Domain Name | Enter the IP address or domain name of the application.
|
||
| Protocol | Select the appropriate protocol from the drop-down menu. | ||
| HTTP/HTTPS | If the selected protocol is either HTTP or HTTPS, you can configure the following advanced HTTP/S settings and WAF Rules: | ||
| Advanced HTTP/S Settings | |||
| Enable HTTP/2 | With HTTP/2, loading times for websites are enhanced by reducing the latency and overhead associated with multiple requests. | ||
| Bypass Authentication | Bypass Authentication lets you get into apps directly without needing to log in through the user portal. You can get a complete overview of all the applications with Bypass Authentication enabled by accessing the WAF section on the Dashboard Page.
|
||
| Relative URL Path | Administrators have the flexibility to configure applications requiring multiple relative paths simultaneously, while also enforcing restricted access exclusively to those paths. Enter a relative URL path. For example: for the URL https://myapps.organization.com/careers/engineering, the relative URL path is /careers/engineering. The relative URL path must start with a forward slash (/).
|
||
| Default Landing Path | The default landing path for an application refers to the initial page or screen that users encounter when they first access the application. With the default landing path set and Restricted Access Path enabled, users are limited to accessing only the landing path and are restricted from accessing other paths within the application domain. ZTNA provides built-in support for a default landing path, for cases where an application’s landing page is hosted elsewhere.
|
||
| Host Header | Enter the Host Header. The Host header is a field in the HTTP request header that specifies the domain name or IP address of the server to which the client is making a request. Choose ‘Custom’ option to modify header values. | ||
| Origin Header | Enter the Origin Header. The Origin header is a field in the HTTP request header that indicates the origin of the request. The origin is the combination of the scheme (for example, ‘HTTP’ or ’HTTPS’), hostname, and port number from which the request is sent. Choose ‘Custom’ option to modify header values. | ||
| WAF Rules | |||
| SQL Injection | Enabling SQL Injection as a WAF rule enhances security by blocking SQL injection attacks. | ||
| Cross Site Scripting | Enabling Cross Site Scripting (XSS) protection as a WAF rule helps mitigate the risk of XSS attacks by filtering and blocking malicious script injections across different websites. | ||
| OS Command Injection | Enabling OS Command Injection as a Web Application Firewall (WAF) rule enhances security by preventing unauthorized execution of operating system commands through web applications. | ||
| System Resource Access | Enabling System Resource Access Injection as a WAF rule enhances security by guarding against unauthorized access attempts to system resources. | ||
| Server Side Template Injection | Enabling Server Side Template Injection (SSTI) as a WAF rule enhances security by detecting and mitigating potential vulnerabilities arising from template injection attacks. | ||
| Port Value | The Port Value will be auto populated based on the selected protocol. | ||
| External Domain Name | Enter the external domain name. This domain name will be accessed directly by end users through the user portal. | ||
| Tags | Enter the tags applicable to the application. | ||
Private Web Apps
Setting Up Private Web Apps
To configure private web applications, provide the following application details:
1. Application Details
| Field | Description | ||
|---|---|---|---|
| IP Address or Domain Name | Enter the IP address or domain name of the application. | ||
| Protocol | Select the appropriate protocol from the drop-down menu. | ||
| HTTP/HTTPS | If the selected protocol is either HTTP or HTTPS, you can configure the following advanced HTTP/S settings and WAF Rules: | ||
| Advanced HTTP/S Settings | |||
| Enable HTTP/2 | With HTTP/2, loading times for websites are enhanced by reducing the latency and overhead associated with multiple requests. | ||
| Bypass Authentication | Bypass Authentication lets you get into apps directly without needing to log in through the user portal. You can get a complete overview of all the applications with Bypass Authentication enabled by accessing the WAF section on the Dashboard Page.
|
||
| Relative URL Path | Administrators have the flexibility to configure applications requiring multiple relative paths simultaneously, while also enforcing restricted access exclusively to those paths. Enter a relative URL path. For example: for the URL https://myapps.organization.com/careers/engineering, the relative URL path is /careers/engineering. The relative URL path must start with a forward slash (/).
|
||
| Default Landing Path | The default landing path for an application refers to the initial page or screen that users encounter when they first access the application. With the default landing path set and Restricted Access Path enabled, users are limited to accessing only the landing path and are restricted from accessing other paths within the application domain. ZTNA provides built-in support for a default landing path, for cases where an application’s landing page is hosted elsewhere.
|
||
| Host Header | Enter the Host Header. The Host header is a field in the HTTP request header that specifies the domain name or IP address of the server to which the client is making a request. Choose ‘Custom’ option to modify header values. | ||
| Origin Header | Enter the Origin Header. The Origin header is a field in the HTTP request header that indicates the origin of the request. The origin is the combination of the scheme (for example, ‘HTTP’ or ’HTTPS’), hostname, and port number from which the request is sent. Choose ‘Custom’ option to modify header values. | ||
| Static URL Address | Provide the Static URL Address, if needed. Certain web applications include sub-URLs that might redirect to other internal URLs to display specific content, like logos or paths. ZTNA faces difficulty loading these due to static page content, resulting in incomplete user display. The Static URL Address, resolves this by revealing blocked content from private web apps. | ||
| WAF Rules | |||
| SQL Injection | Enabling SQL Injection as a WAF rule enhances security by blocking SQL injection attacks. | ||
| Cross Site Scripting | Enabling Cross Site Scripting (XSS) protection as a WAF rule helps mitigate the risk of XSS attacks by filtering and blocking malicious script injections across different websites. | ||
| OS Command Injection | Enabling OS Command Injection as a Web Application Firewall (WAF) rule enhances security by preventing unauthorized execution of operating system commands through web applications. | ||
| System Resource Access | Enabling System Resource Access Injection as a WAF rule enhances security by guarding against unauthorized access attempts to system resources. | ||
| Server Side Template Injection | Enabling Server Side Template Injection (SSTI) as a WAF rule enhances security by detecting and mitigating potential vulnerabilities arising from template injection attacks. | ||
| Web RDP | If the selected protocol is Web RDP, you can configure the following attributes: | ||
| RDP Access Type | |||
| If the selected RDP access type is ‘Limited Application Access’, enter the Remote Application Name, Remote Application Directory, and Remote Application Argument. | |||
| Permissions | |||
| Allow Clipboard Access | Allow business user to copy/paste text content from/to specific application. By default, it is restricted. | ||
| Allow File Transfer | Allow business user to upload and download files from/to specific applications.(i.e. if user needs to download a file from RDP instance to base machine, you can enable the option). You need to configure below fields in order to grant file transfer access. | ||
| Content Inspection | Applications using webRDP, webSSH, and webVNC protocols with content inspection activated will be listed on the Content Inspection Records page. Content Inspection enhances security by detecting threats and ensuring authorized file transfers. | ||
| Allow Session Recording | Switch on recording of business user activities for a specific application. Recordings can be found under Audit logs. (https://docs.seqrite.com/docs/seqrite-ztna/settings/audit-trail/). | ||
| WebSSH | If the selected protocol is WebSSH, you can configure the following attributes: | ||
| Private Key | |||
| Providing support for importing a private key file while accessing webSSH applications While configuring a WebSSH application the administrator can import the private key file as shown in the following image, so that the end user can access the application by entering the valid credentials. 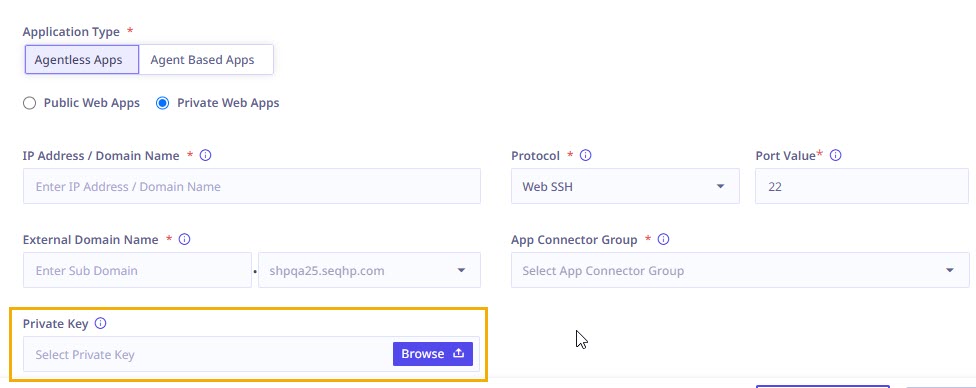
|
|||
| Permissions | |||
| Allow Clipboard Access | Allow business user to copy/paste text content from/to specific application. By default, it is restricted. | ||
| Allow File Transfer | Allow business user to upload and download files from/to specific applications. (i.e. if user needs to download a file from RDP instance to base machine, you can enable the option). You need to configure below fields in order to grant file transfer access. | ||
| Content Inspection | Applications using webRDP, webSSH, and webVNC protocols with content inspection activated will be listed on the Content Inspection Records page. Content Inspection enhances security by detecting threats and ensuring authorized file transfers. | ||
| Allow Session Recording | Switch on recording of business user activities for a specific application. Recordings can be found under Audit logs. (https://docs.seqrite.com/docs/seqrite-ztna/settings/audit-trail/). | ||
| Web Telnet | If the selected protocol is Web Telnet, you can configure the following permissions: | ||
| Permissions | |||
| Allow Clipboard Access | Allow business user to copy/paste text content from/to specific application. By default, it is restricted. | ||
| Allow Session Recording | Switch on recording of business user activities for a specific application. Recordings can be found under Audit logs. (https://docs.seqrite.com/docs/seqrite-ztna/settings/audit-trail/). | ||
| Web VNC | If the selected protocol is Web VNC, you can configure the following permissions: | ||
| Permissions | |||
| Allow Clipboard Access | Allow business user to copy/paste text content from/to specific application. By default, it is restricted. | ||
| Allow File Transfer | Allow business user to upload and download files from/to specific applications. (i.e. if user needs to download a file from RDP instance to base machine, you can enable the option). You need to configure below fields in order to grant file transfer access. | ||
| Content Inspection | Applications using webRDP, webSSH, and webVNC protocols with content inspection activated will be listed on the Content Inspection Records page. Content Inspection enhances security by detecting threats and ensuring authorized file transfers. | ||
| Allow Session Recording | Switch on recording of business user activities for a specific application. Recordings can be found under Audit logs. (https://docs.seqrite.com/docs/seqrite-ztna/settings/audit-trail/). | ||
| Port Value | The Port Value will be auto populated based on the selected protocol. | ||
| External Domain Name | Enter the external domain name. This domain name will be accessed directly by end users through the user portal. | ||
| App Connector Group | Choose the relevant App Connector Group from the dropdown menu. | ||
| Tags | Enter the tags applicable to the application. | ||
Agent Based Apps
To configure agent based applications, provide the following application details:
Setting Up Agent-Based Apps
To configure agent-based applications, provide the following information. For more details on Seqrite Universal Agent, refer to the Seqrite Univeral Agent and Deployment Sections.
1. Application Information
2. Additional Configuration (Optional)
3. Advanced HTTPS Settings
Note ☛
For the Agent Based Apps the supported protocols are HTTP, HTTPS, RDP, SSH, Telnet, SMB, VNC, SFTP, FTP, and SCP.
Note ☛
Presently, in order to establish a connection with the SMB app on Windows OS, it is necessary to stop and disable the server services, followed by a reboot of the device.
Note ☛
After upgrading from ZTNA 2.2.4 to ZTNA 2.3.0, it is necessary to upgrade the agent to version 1.10.x during the downtime. If the customer’s agent version is 1.9.x or earlier, agent-based web or legacy applications (such as SSH) may fail to reconnect. In such cases, the customer must manually restart the ZTNA agent to restore connectivity to these applications. Automatic reconnection occurs only if the agent-based applications are configured for “Auto Connect”.
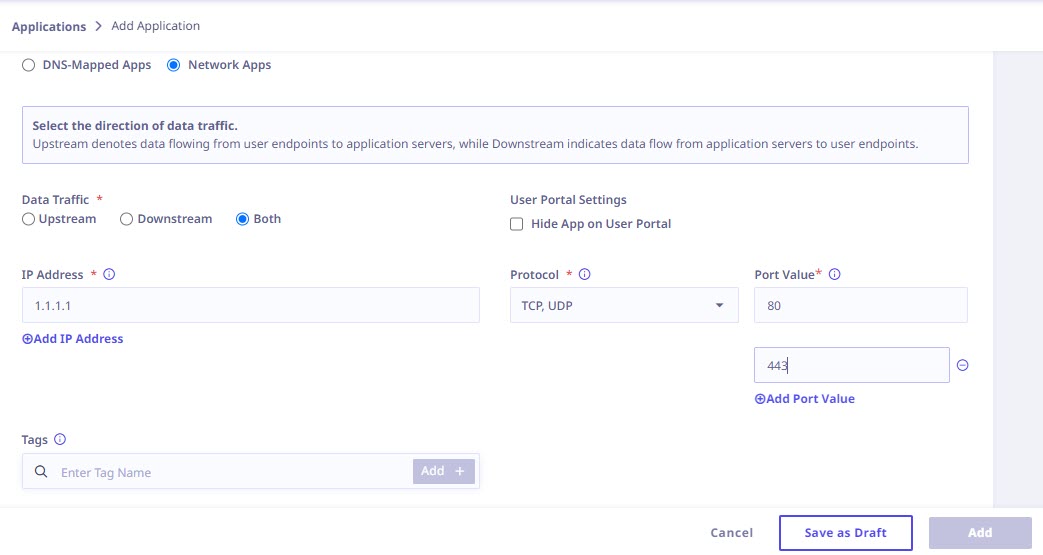
Network Apps
This application category supports a wide spectrum of TCP-UDP applications. With this feature, administrators gain the flexibility to configure private IPs, subnets, single ports, port ranges, and more. This advancement empowers seamless integration of VoIP, SIP, and streaming protocol-based applications within your network infrastructure. Access to this feature-rich category is available through an additional license subscription.
Note ☛
This feature is available only for Enterprise and Standard licenses through an additional license subscription.
Setting Up Network Apps
To configure network applications, provide the following application details:
1. Application Details
| Field | Description | ||
|---|---|---|---|
| Data Traffic | Select the direction of data traffic. | ||
| Upstream | Upstream denotes data flowing from user endpoints to application servers. Select this option if you want to manage outgoing traffic from the application. | ||
| Downstream | Downstream denotes data flowing from application servers to user endpoints. Choose this option if you need to manage incoming traffic to the application. | ||
| Both | If you want to manage both incoming and outgoing traffic opt for this option. | ||
| IP Address | Enter IP addresses or IP address ranges for the application. You can provide a maximum of 20 IP addresses or IP address ranges. | ||
| Protocol | Select TCP and/or UDP protocol from the drop-down menu. | ||
| Port Value | You have the option to specify either multiple single port values or multiple ranges of port values. You can configure multiple IP addresses, ports, and protocols all in one place. Choose from IP ranges, single IP addresses, or entire subnets, and manage both TCP and UDP protocols across multiple ports. Simplify your admin tasks with ease. | ||
| Tags | Enter the tags applicable to the application. | ||
Considerations for setting up network applications with TCP-UDP protocols
App Connector Configuration for Network Apps
Note ☛ For security reasons, the administrator must manually perform the following steps on the system where the app connector is installed.
If you are running the app connector on a Linux host system, you will need to ensure that your host OS meets the following requirements:
Important Note ☛
You need to allow UDP port 1194, 1195, and 1197 in your host's firewall.
If you need to allow Ingress/Egress traffic from the app connector to your application, you will need to allow this traffic in your host machine's firewall. There are a couple of ways to achieve this:
For Debian-based systems using UFW:
If UFW is enabled in your host system, then you can allow traffic from and to the tun interface of the app connector using the following UFW commands:
For all other systems (including Debian-based) without UFW (i.e. UFW disabled/not present):
IP forwarding also needs to be enabled on Linux host systems. To check the current status of IP forwarding, run the following command:
cat /proc/sys/net/ipv4/ip_forward
If the return value is 0, then it indicates that forwarding is disabled. Enable it with the following command:
echo 1 > /proc/sys/net/ipv4/ip_forward
Important☛
All of the above commands require super-user privileges.
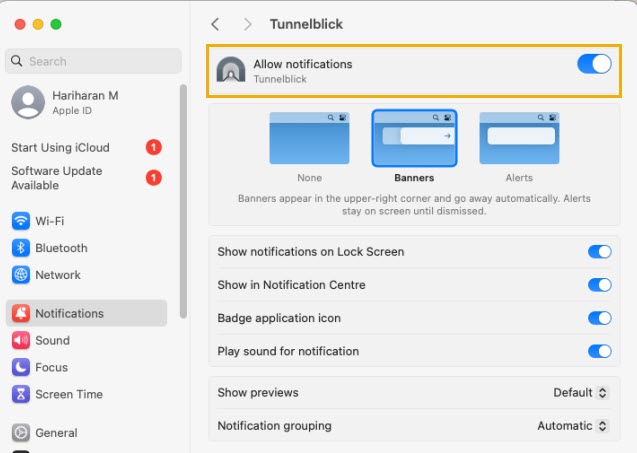
Connecting Network Apps from macOS System
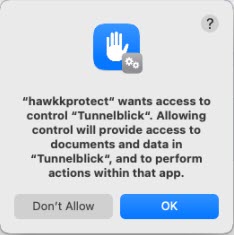
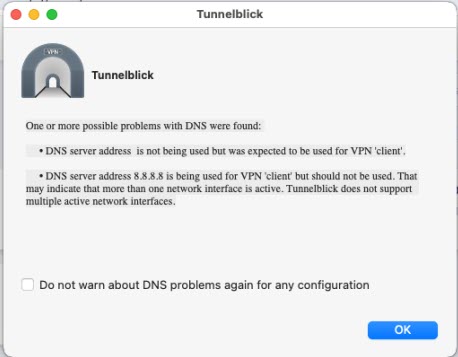
When connecting network applications from a macOS system, you may encounter the following pop-ups. To proceed, simply click “OK”.
Accessing Network-Based Applications on a Windows 7 Virtual Machine
To access network-based applications on a Windows 7 virtual machine (VM), follow these steps: