
This page provides a comprehensive list of users who were added through the configuration of both the local Seqrite Identity Provider and prominent external Identity Providers (AD/ADFS/Azure/Google) during the site setup process.
The following details for each user are displayed.
| Column Name | Description |
|---|---|
| User Name | Username as per the IdP details (This column will be visible for external identity providers.).You can sort the users alphabetically by clicking on this label. |
| First Name | First name of the user. |
| Last Name | Last name of the user. |
| Email ID | Email ID of the user. |
| Phone | The contact number of the user. (Only visible for Seqrite IdP). |
| State | The state of the user (Enabled / Disabled (Blocked) / Invited / Not Invited). (Only visible for Seqrite IdP). |
| Dynamic Tags | Dynamic tags assigned to the user. (Only visible for an external IdP). |
| Static Tags | Static tags assigned to the user. (Only visible for an external IdP). |
| Last Login | The last login timestamp of the user. |
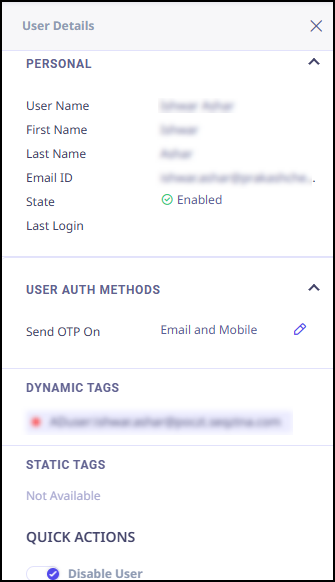
When you click any user, the above information is displayed in the right panel as shown in the following screenshot.
Actions Available with Users
Seqrite Identity Provider
When you select a single or multiple users, you can perform the following on users:
-
Enable
After a user signs up for Seqrite ZTNA, administrator can enable the user using this option. The user can access the portal they are authorized to access.
-
Disable
To disable a user.
-
Send Invite
If a user added in HawkkEye appears in Seqrite ZTNA for the first time, administrator can send that user an invite to register for Seqrite ZTNA. The user will receive an email with a link to register and log in.
-
Forced Logout
As a Seqrite ZTNA Administrator, you can manage user sessions and enforce immediate logouts across all applications within your account. This guide outlines the steps required to revoke live user sessions, block user access, and configure policies for user management. The web help is designed to ensure a smooth and efficient user management experience.
- Navigate to the ‘User Management’ section within the Admin console.
- Identify and select the specific user whose session needs to be revoked.
- Click ‘Logout’ to initiate a logout for the user.
- This functionality permits a simultaneous logout of up to 10 users at a time.
- If the user’s identity profile is active, a new session can be generated after the current one is revoked.
- Access the 'Visibility' page within the Admin console.
- Find and select the user for whom you want to revoke the session across all applications.
- In the right panel, navigate to the 'Quick Actions' section and click 'Logout' to terminate all active sessions linked to the user.
- All activities related to revoking live user sessions are automatically logged in the audit trail.
- Ensure that you regularly monitor the audit trail for any important updates or changes made to user sessions.
Revoking Live User Sessions with Force Logout Functionality
The Force Logout functionality is applicable for all Identity Providers (IDPs) including Google, Local, On-prem AD, ADFS, and Azure. For the Seqrite Identity Provider, it is possible to deactivate only enabled users.
Note ☛
The Force Logout action ensures that the user is logged out within a maximum of 2 minutes from all active sessions.
The Administrator has the capability to revoke active user sessions via both the User Management page and the Visibility page.
User Management Page:
To Force Logout a user from the User Management Page, follow these steps:
Note ☛
Visibility Page:
To Force Logout a user from the Visibility Page, follow these steps:
Blocking User Access Permanently
Policy Configuration to Disable/Delete Users: Admins have the authority to permanently block user access by adjusting policy configurations or by disabling/deleting a user account.
Audit Trail Logging
If no users are selected, the default actions such as Login Status Filter, Search, Export Report, and Column Preferences will be visible.
-
Default Actions
Administrators can now filter users by login status (logged in, not logged in) over defined periods(1 hr, 24 hrs, 7 days, 30 days). Options include all users and those with no login history, with results exportable as CSV. Detailed user login and logout histories are available in the audit trail for the past month.
You can search for users and specify column preferences to display on the user list page.
External Identity Providers
-
Enable Two Factor Authentication (2FA)
As a security enhancement, the aministrator has the ability to enable 2FA for users. This feature requires a two-step verification process, thereby providing a higher level of security for the user’s account.
Customers using On-Prem Active Directory (2012/2016/2019) and all SAML-based identity providers, including ADFS, Google Workspace, and Microsoft Azure, can integrate a Two-Factor Authentication (2FA) system for their portal. With this configuration, end users must enter a valid password followed by a One-Time Password (OTP) to gain access.
Admin Settings
This feature can be enabled or disabled per tenant, providing flexibility and control over the authentication process.
Experience
When 2FA is enabled, end users will follow a two-step login process. First, they enter their username and password. Then, they will be directed to a screen where they are prompted to input the OTP received via email or SMS.
If 2FA is disabled, the authentication process remains the same as it is currently. End users can log in using their username and password without an additional OTP requirement.
Real-Time Updates
Any changes made to the Active Directory server will be reflected in the 2FA system. For instance, if a user's mobile number is updated, the OTP will be sent to the newly updated mobile number.
Additional Features- The system provides an option to resend the OTP after 20 seconds, ensuring convenience for end users.
- In cases of repeated failed attempts (5 times), the user account will be automatically blocked for 10 minutes, enhancing security measures.
- All failed login attempts are displayed on the Seqrite ZTNA dashboard, allowing admins to monitor potential security threats effectively.
Steps to Enable SMS for Two-Factor Authentication for Azure
To enable two-factor authentication (2FA) for Azure users, administrators must configure the necessary settings in Microsoft Entra ID.- Log in to Microsoft Entra: Access the portal at https://entra.microsoft.com/.
- Navigate to Authentication Methods:
- Select Protection from the left-hand menu.
- Click on Authentication Methods.
- Enable SMS Functionality:
- Locate the SMS option within the authentication methods list.
- Ensure that SMS is enabled to allow users to receive 2FA prompts via text message during their login process for Microsoft Azure.
Following these steps will ensure that users can utilize SMS as a method for two-factor authentication during their login to Azure services.
User Auth Methods
- Navigate to Users.
- Select user/users for whom you want to apply user auth method and click User Auth Methods.
- Select user auth method that is Email and Mobile or Email and WhatsApp and then click Save.
-
Forced Logout
This is covered in the section Forced Logout.
-
Default Actions
This is covered in the section Default Actions.
Along with Email and SMS, two-factor authentication (2FA) one-time password (OTP) can now be delivered via WhatsApp too. Within the User Detail right‑side panel, you can change the OTP delivery preference for each individual user. You can choose authentication method—either Email and Mobile or Email and WhatsApp to send OTPs to users for two-factor authentication.
In addition, users have an option to receive a one-time password (OTP) on their secondary email address. This feature is available only if the secondary email has been configured within the Seqrite Centralized Security Management (CSM).
Note: The secondary email cannot be used as a login ID for ZTNA, it is only for receiving OTPs.
To apply user auth method, follow these step:
User will receive an OTP based on selected authentication method.