
The purpose of this document is to provide instructions on how to configure and manage Zimbra to enable SAML integration.
Prerequisites
- Integrate with Seqrite ZTNA
To add the SaaS application follow these steps:- Log into Seqrite ZTNA admin console.
- Navigate to the Applications section.
- Navigate to the SaaS Applications tab and click.
- To add Zimbra application click Browse SaaS Application Catalog.
- Click Add + of Zimbra application card.
- Enter the Application Name. Provide the Application Description and Logo if any.
- Add the ACS URL, Entity ID, and External Address as per the Zimbra Server Configurations. For Example:
- ACS URL:
https://zimbra.domain.com/service/extension/samlreceiver - Entity ID:
https://zimbra.domain.com/service/extension/samlreceiver
Ensure your Zimbra Domain is substituted in place of
zimbra.domain.comin both URLs.
Also, enter the Zimbra Domain in the External Address field. For example, use http://zimbra-domain.com/.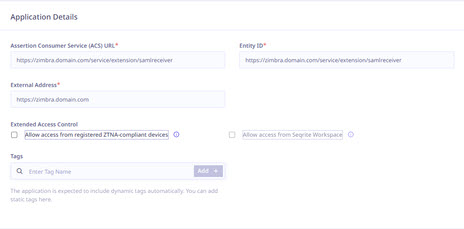
- ACS URL:
- Select the following checkboxes as appropriate to control access from managed laptops, desktops, or mobile devices.
- Allow access from registered Seqrite ZTNA-compliant devices:
Only users with registered Seqrite ZTNA-compliant devices (on which the Seqrite ZTNA agent is installed and active), including both desktops and laptops, can access the applications. - Allow access from Seqrite Workspace:
Mobile users are able to access applications only through the Workspace. To know more about accessing SaaS application through Seqrite Workspace, see Seqrite EMM Documentation.
Note: iOS is not supported, iOS users can access applications outside the Workspace also.
- Allow access from registered Seqrite ZTNA-compliant devices:
- Click Add to add the application.
- Navigate to Zimbra Server
Access your Zimbra server to configure SAML settings for integration.
Step 1: Configure Zimbra Server
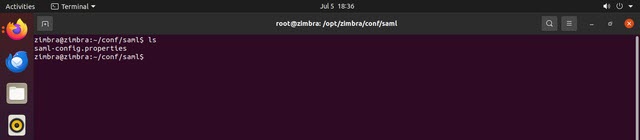
- Create Configuration Directory and File:
mkdir -p /opt/zimbra/conf/saml
vi /opt/zimbra/conf/saml/saml-config.properties
Add the following content to
saml-config.properties:
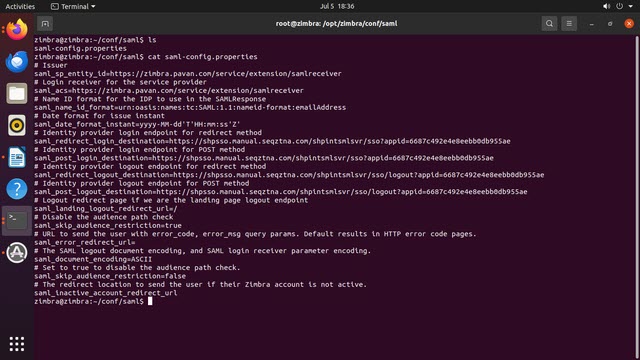

Copy the SAML Login URL from the ZTNA application's SAML Settings above into thesaml_redirect_login_destinationandsaml_post_login_destinationfields in the Zimbrasaml-configProperties file as specified below:
Thesaml_redirect_logout_destinationandsaml_post_logout_destinationfields can be left empty.# Issuer saml_sp_entity_id=https://zimbra.domain.com/service/extension/samlreceiver # Login receiver for the service provider saml_acs=https://zimbra.domain.com/service/extension/samlreceiver # Name ID format for the IDP to use in the SAMLResponse saml_name_id_format=urn:oasis:names:tc:SAML:1.1:nameid-format:emailAddress # Date format for issue instant saml_date_format_instant=yyyy-MM-dd'T'HH:mm:ss'Z' # Identity provider login endpoint for redirect method saml_redirect_login_destination=Saml Login URL from ZTNA Zimbra Application SAML Settings # Identity provider login endpoint for POST method saml_post_login_destination=Saml Login URL from ZTNA Zimbra Application SAML Settings # Identity provider logout endpoint for redirect method saml_redirect_logout_destination= # Identity provider logout endpoint for POST method saml_post_logout_destination= # Logout redirect page if we are the landing page logout endpoint saml_landing_logout_redirect_url=/ # Disable the audience path check saml_skip_audience_restriction=true # URL to send the user with error_code, error_msg query params. Default results in HTTP error code pages. saml_error_redirect_url= # The SAML logout document encoding, and SAML login receiver parameter encoding. saml_document_encoding=ASCII # The redirect location to send the user if their Zimbra account is not active. saml_inactive_account_redirect_url - Copy SAML Certificate: Copy the SAML certificate from ZTNA Admin Console to
/tmp/idpcert.pemon the Zimbra server.cp /tmp/idpcert.pem /opt/zimbra/lib/ext/saml/idpcert.pem - Set Up IDP Certificate:
mkdir /opt/zimbra/lib/ext/saml cp /opt/zimbra/extensions-network-extra/saml/samlextn.jar /opt/zimbra/lib/ext/saml/ su zimbra cat /tmp/idpcert.pem | xargs -0 zmprov md zimbra.domain.com zimbraMyoneloginSamlSigningCert - Configure Zimbra Settings:
zmprov mcf zimbraCsrfAllowedRefererHosts *.ztnacertificatedomain
zmprov md zimbra.domain.com zimbraVirtualHostName zimbra.domain.com
/opt/zimbra/bin/zmlocalconfig -e zimbra_same_site_cookie=""
zmprov mcf zimbraCsrfRefererCheckEnabled FALSE
zmmailboxdctl restart
Step 2: Configure Zimbra Admin Console
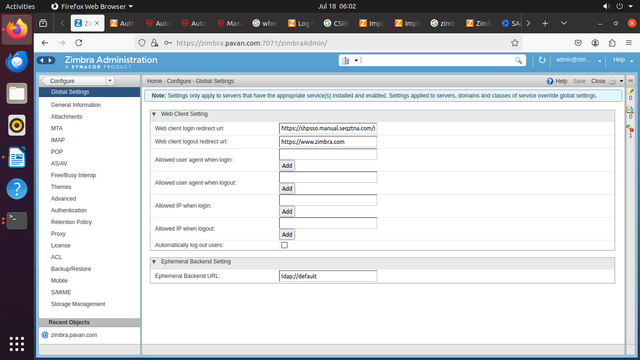
- Global Settings:
- Open Zimbra Admin Console.
- Navigate to Home > Configure > Global Settings > Authentication.
- Add the SAML Login URL from ZTNA Zimbra SaaS Application under SAML Settings as Web Client Login Redirect URL.
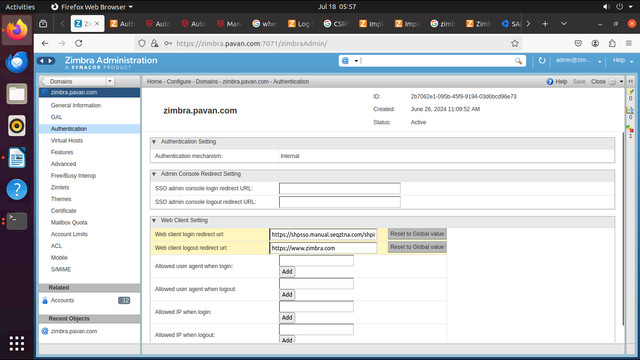
- Domain Settings:
- Navigate to Home > Configure > Domains > zimbra.domain.com > Authentication.
- Add
https://zimbra.comas Web Client Login Redirect URL.
- Additional Settings:
- Navigate to Home > Configure > Global Settings.
- Add the Web Client Login URL and Web Client Logout URL as per your configuration.
- Save Changes:
- Click on Save after configuring each section.
Step 3: Testing
- Try accessing Zimbra from a browser. It should redirect to the ZTNA SSO page for authentication.
- After successful authentication via ZTNA, users should be able to access Zimbra as SAML SSO.
Notes:
- Zimbra logout will only work after the user logs out from the ZTNA user portal.
- Ensure all URLs and certificates are correctly configured and updated as per your specific environment settings.